Developer Applications
Developer applications
In the developer section, Applications opens the application list and creation flow. After an application is selected, the cabinet shows only the subsections supported by its type.
Items inside an application
- Settings is available for every type and contains the basic details and danger zone described below.
- Members is available for every type and manages the application team, not project members.
- OAuth is shown for Website integration and Tool applications.
- Ready-made solution is shown for the corresponding application type.
- Tools and Embedded page are shown for Tool applications.
- Webhooks is available for every type.
Before giving an application to users, check its name, description, purpose, redirect URI, and permission set. For an application without OAuth, check only the settings actually shown in its menu.
General settings
- the avatar and avatar removal are available after the app is created;
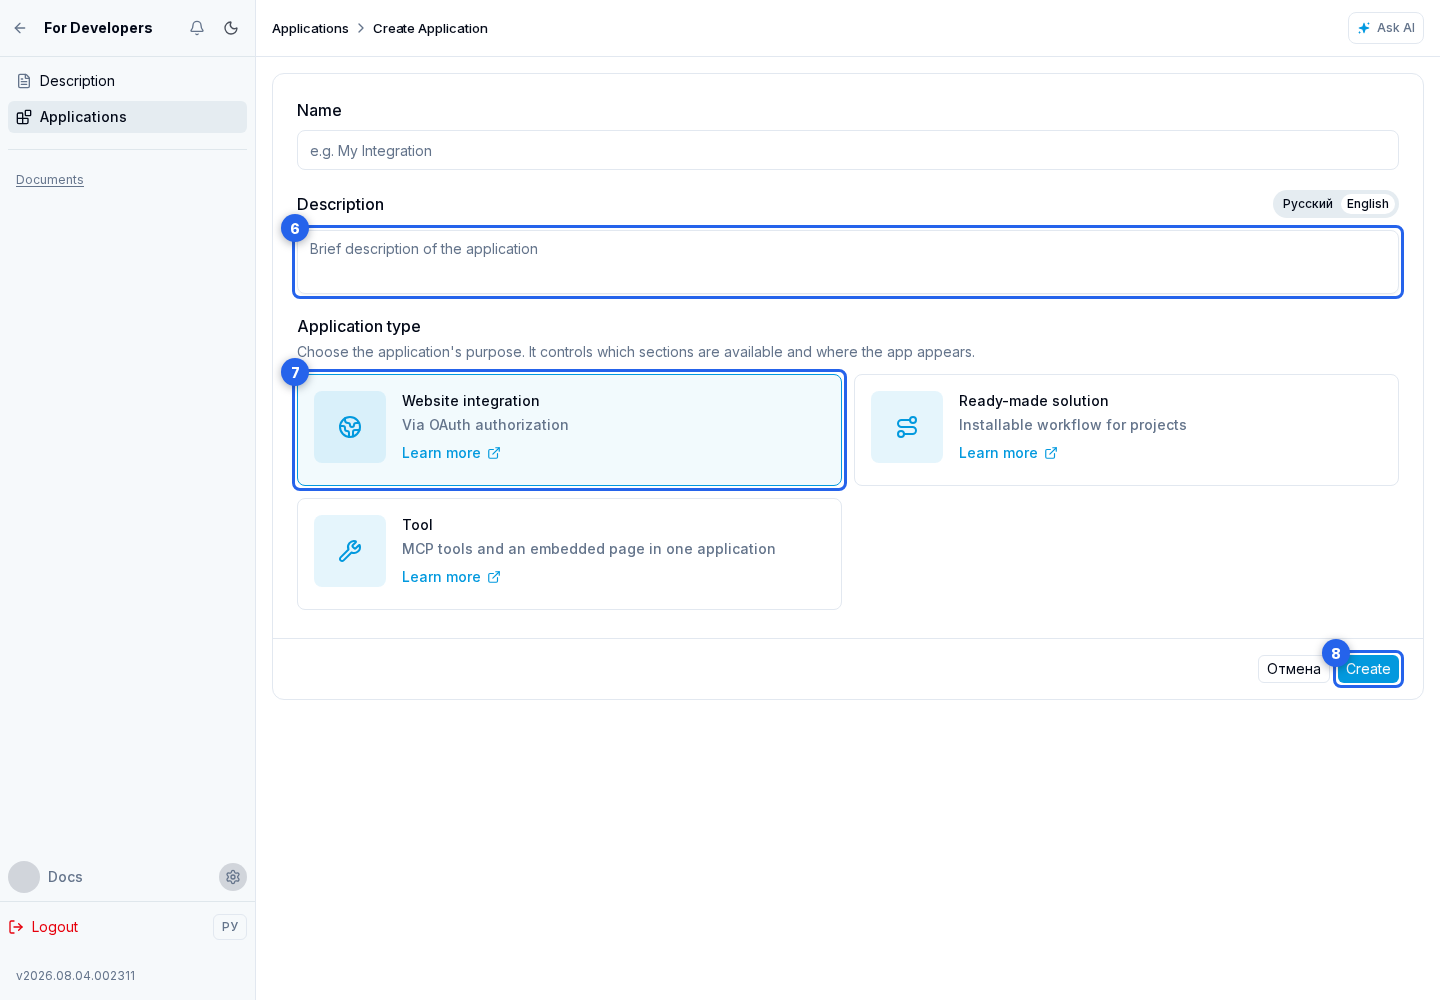
- the name and description are entered during creation and can be edited later;
- website URL is entered in the settings of a created app;
- the application type is selected during creation and cannot be changed later;
- Create saves the new app.
Application type
The type is selected when the application is created and cannot be changed later. Create a new application with the appropriate type when you need a different flow.
- select one option card;
- Website integration uses OAuth settings;
- Ready-made solution does not use OAuth and appears in the ready-made solution catalog;
- Tool applications provide separate settings for agent actions and an embedded page after creation. You can enable either capability or both, and OAuth is available for this type;
- the "Documentation" link opens help for the selected purpose.
Application list
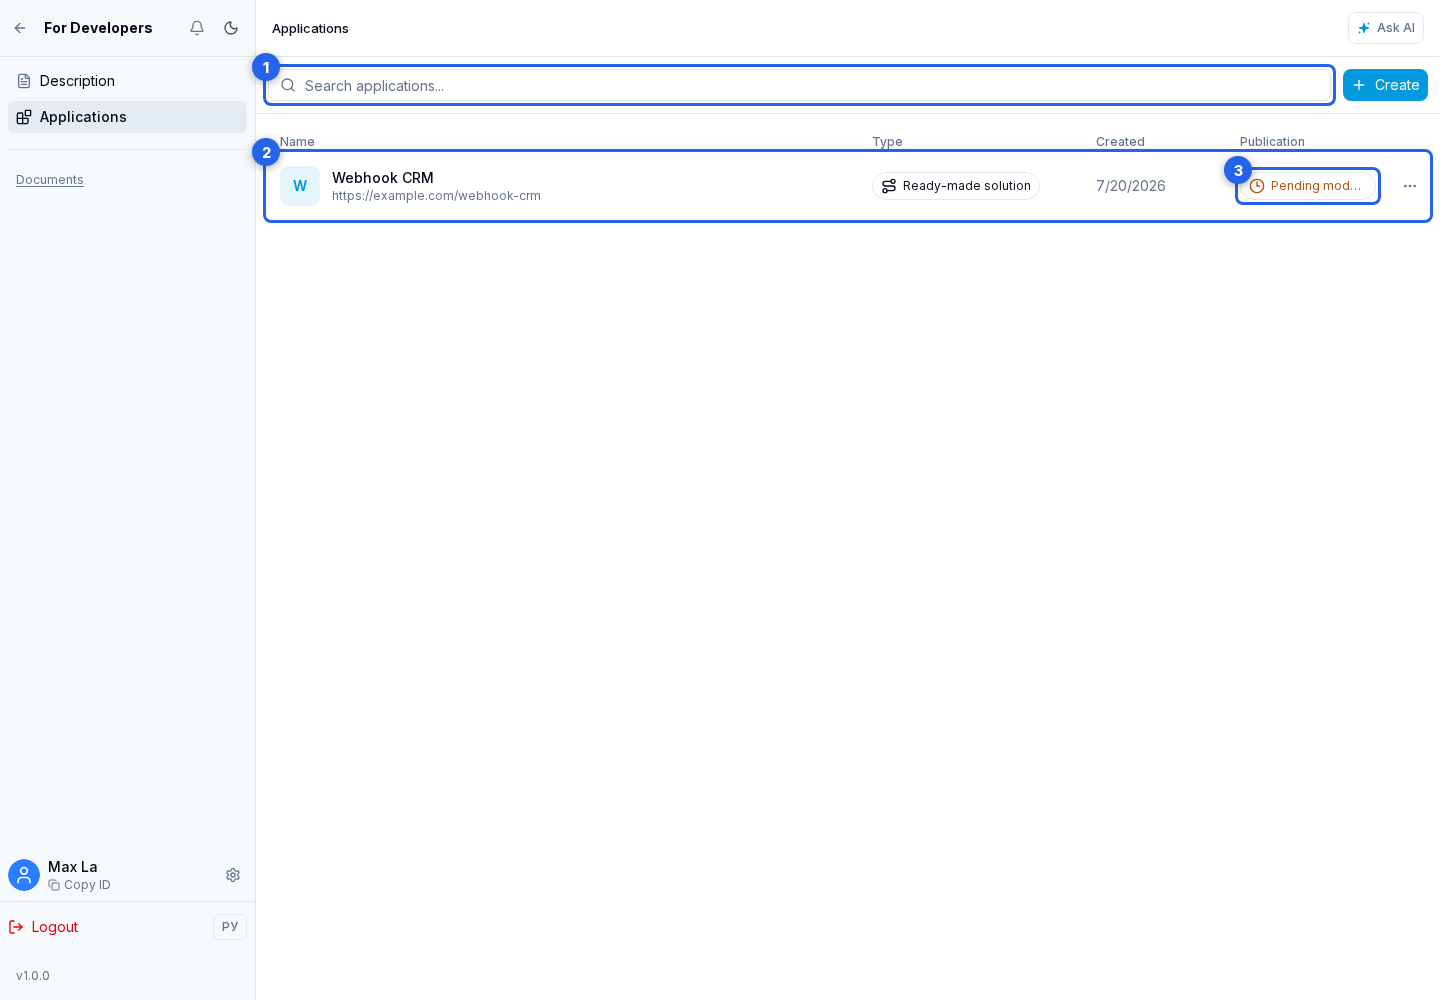
When at least one application exists, this section displays a table with its name, type, creation date, and publication status. On a narrow screen, the date is hidden and an ordinary status may appear as an icon only; its full name remains available in the tooltip. Pending moderation stays visible at every width.
The Search applications field searches the name, description, website address, type, and publication status. Clear or refine the query when there are no matches.
Select an application row to open its settings. The Publication column shows whether the application is private, pending moderation, public, or rejected. For Pending moderation, select the badge to open the explanation and submission date; the status updates automatically after review.
The actions menu lets you open the application. Open website appears only when a website URL is saved in the application settings.
How to create an app
Open the developer app list.
- Select Create app.
- Enter a name and, if needed, a description.
- Select the app type. It cannot be changed after creation.
- Select Create.

Ready-made solution settings
- the developer access switch for related dialogs is shown automatically for a ready-made solution and is enabled by default during installation;
- the owner of the installing project can turn access off before installation or later in app management;
- there is no separate author setting for this capability: the author cannot require or enable access independently in another project;
- when the project owner enables access, the developer sees only dialogs where agents of this ready-made solution participated; other dialogs and project entities remain unavailable;
- "Show agent settings in projects" controls whether installed agent settings are visible;
- if settings visibility is disabled, the ready-made solution agent can be tested in the project, but instruction, model, MCP, knowledge base, variables, and other settings are hidden.
Agent tools
For a Tool application, open the Tools section. The main switch controls whether these tools can be added to agents after installation. It does not control the application's embedded page.
Choosing a connection method
Choose one mode for the whole application:
- Builder — the application contains one or more HTTP tools with separate URLs and parameters;
- MCP server — the application connects an existing MCP endpoint and loads its tool list from the server.
After changing the mode, select Save. Installed projects receive only the currently saved mode.
HTTP tool builder
Select Add. In the tool form, specify:
- a system name, for example
find_customer; - the handler URL with
httporhttps; - an agent-facing description that explains when and why to call the action;
- in the parameter list, a name,
string,number, orbooleantype, clear description, and required flag for each argument.
Select Add parameter for each new argument. When the form is complete, select Save. A saved tool in the list can be reopened and changed. In an existing tool's form, Delete requires confirmation and permanently removes it from the application. Use a system name and description that clearly distinguish the action from the application's other tools.

The handler receives JSON in this form:
{
"event_id": "019d0000-0000-7000-8000-000000000001",
"event_type": "tool_call",
"timestamp": "2026-07-30T12:00:00.000Z",
"app_id": "app-id",
"installation_id": "installation-id",
"project_id": "project-id",
"tool_name": "find_customer",
"arguments": {
"customer_id": "123"
}
}
Use event_id as an idempotency key because an automatic or manual retry may send the same action again.
Execution modes and retries
In Execution mode, choose:
- Instant execution — the agent waits for one HTTP response and receives its body as the tool result; there are no automatic retries;
- Wait for result — the request is queued, the agent pauses this step, and continues after a successful result;
- Background operation — the request is queued, but the agent does not wait for or use the response to continue the current step.
One attempt waits 10, 30, 60, or at most 120 seconds. Select the value in HTTP attempt timeout. For the two asynchronous modes, select a retry window:
- 5 minutes — 5 attempts: immediately, then after 15 seconds, 1, 3, and 5 minutes;
- 3 hours — 8 attempts: immediately, then after 1, 5, 15, and 30 minutes, and 1, 2, and 3 hours;
- 1 day — 12 attempts: immediately, then after 1, 5, 15, and 30 minutes, and 1, 2, 4, 8, 12, 18, and 24 hours.

MCP server
In MCP mode, enter the server URL and, when required, the authorization header name and value. A saved secret is not shown again; replace it with a new value or mark the saved value for removal, then save the settings.

In the installed project, the required actions are enabled separately in each agent's settings. Disabling tools in the application makes them unavailable to agents but does not disable the embedded page.
Embedded page
For a Tool application, open the Embedded page section. The availability switch controls whether installed-project users can open the page; application tools continue to work independently.
Main URL and developer mode
Enter a complete http or https address in Main URL. Use HTTPS for normal publication. The page must allow framing and must not rely on navigating the whole top-level window.
Enable Developer mode so application team members open the page from a separate developer URL. This URL can use http://localhost or a separate test environment. Regular users of the installed application continue to open the main URL.

Testing and project context
Select Test and choose an available project. When developer mode is enabled, testing opens the developer URL; otherwise, it opens the main URL. Testing remains available while page publication is disabled.

The cabinet adds these context parameters to the URL:
senler_context_version=1— format version;senler_mode=testduring testing andsenler_mode=installedafter installation;senler_app_idandsenler_project_id;senler_installation_id— only for an installed page.
Do not treat these identifiers as secrets or proof of access. Use OAuth/API with the installation's granted permissions to read or change data. The embedded frame allows scripts, forms, modal windows, downloads, popups, clipboard access, full-screen mode, and the microphone. Treat browser capabilities outside this list as unavailable until separately verified.
Save changes with the save action. If the test does not open, check the URL, Content-Security-Policy/X-Frame-Options headers, whether the browser can reach the local server, and errors inside the iframe.
Danger zone
- deleting the application;
- warning: installations and tokens will be revoked;
- the action is dangerous and requires confirmation.
OAuth settings
OAuth settings are available for Website integration and Tool applications. This screen is not used for a ready-made solution.
The OAuth credentials section contains the Client ID and Client Secret. The Client ID identifies the application; transfer it to the integration with Copy Client ID. The Client Secret authenticates the application: do not publish it or place it in client-side code. When needed, show or hide the value, or use Copy Client Secret.
Client Secret regeneration
Regenerate secret opens a warning dialog. Cancel keeps the current secret, while confirmation issues a new secret and immediately invalidates the old one.
After confirmation, show or copy the new Client Secret and update every integration that used the previous value. Until they are updated, OAuth requests using the old secret will fail.
Redirect URI
The Redirect URIs section lists the addresses that can receive a user after authorization. Select Add URI, enter a complete URL in the new address field, and use Remove when an address is no longer needed.
The redirect URI in the authorization request must match one of the saved addresses. Check the protocol, domain, path, and trailing slash; an address mismatch can cause authorization to be rejected.
Permissions
Application permissions define the maximum set of actions the application can request from a project. Select only the required access level for each group. The basic permission required for the application to work with a project is locked and cannot be removed.
Select all or Deselect all changes the optional groups; review them individually before distributing the application. Permission and Redirect URI changes take effect after saving the OAuth settings. Client Secret regeneration is a separate immediate action and does not wait for this button.
App members
The members page lets you invite developers and review invitations. The status filter separates pending, accepted, declined, expired, and cancelled invitations.
The recipient opens the developer app invitation page. It shows the app, inviter, and role. A pending invitation can be accepted or declined; acceptance opens the app, while an expired or already processed invitation shows the corresponding state.