
Agent Tools
Summary
Capabilities determine how the agent replies, what it can recognize and create, which tools it can use, and which actions it may perform. Change them in the agent draft; the new configuration applies to live dialogs after publication.
Open the capabilities
- In the agent form, open the Tools tab.
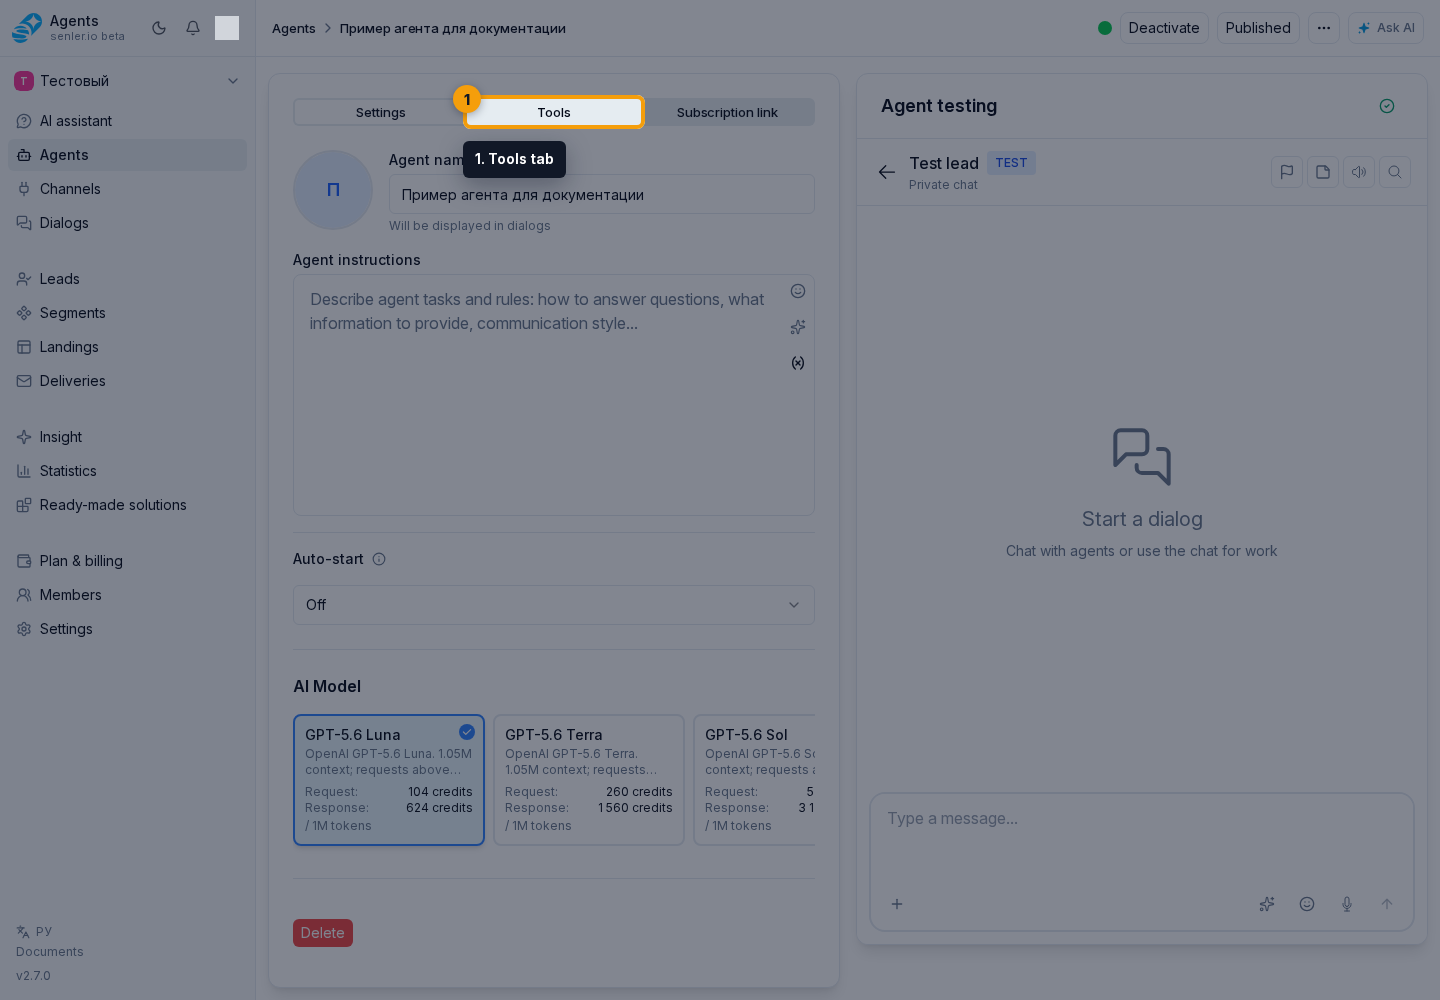
- Find the AI message processing toggle. In the current interface, it is called Analyze messages and perform actions with AI: it controls both response preparation and actions performed through tools.
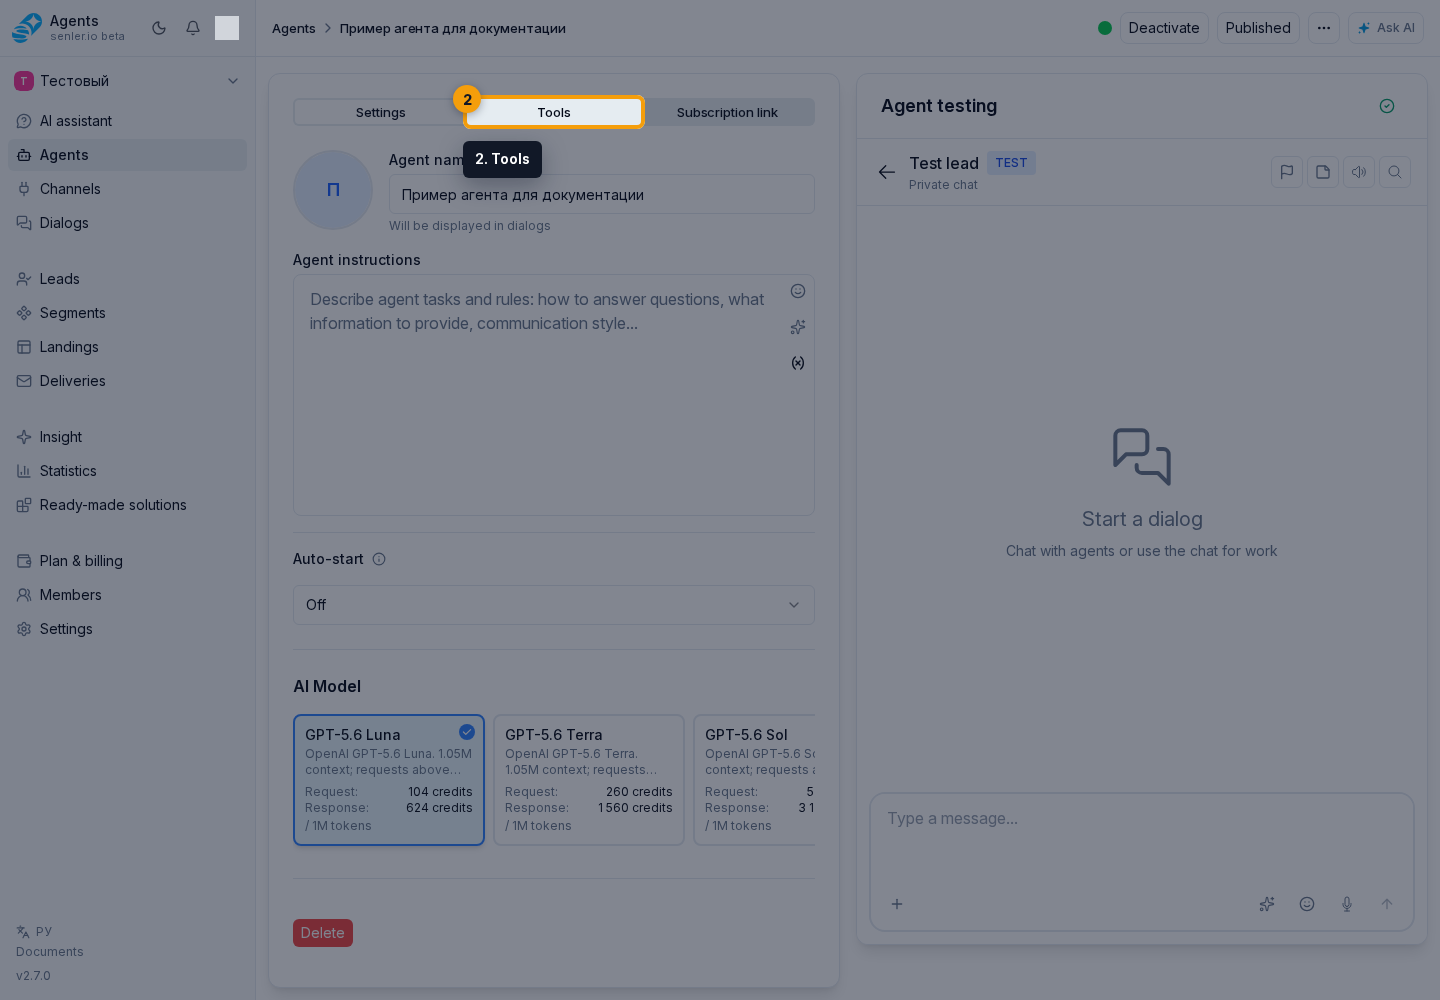
Next, choose a processing mode for your task, then configure the required tools and permissions.
Choose settings for a scenario
| Goal | What to enable or check |
|---|---|
| Reply to clients automatically | Select Customer conversation mode |
| Perform actions without a final client-facing reply | Select Background processing and grant access to the required tools |
| Collect analytics only | Select Metrics collection only and configure metrics |
| Give the operator a ready draft instead of an automatic reply | Enable AI processing and Prepare an operator reply draft, then describe in the instructions when a draft is needed |
| Avoid a second reply after a person has responded | Keep pending response cancellation after a project operator message enabled |
| Avoid a second reply after an automation message | Keep pending response cancellation after an automation message enabled |
| Notify the client before lengthy processing | Enable Preliminary answers |
| Send a separate greeting after a subscription without a message | Enable Reply on segment subscription for the agent assigned to that segment |
| Show response preparation without technical details | Under Widget behavior, select Reasoning stages |
| Show only the regular typing indicator | Under Widget behavior, select “Agent is typing” status |
| Show the response as it is generated | Enable Show response while it is being generated |
| Highlight or change website elements at the user's request | Enable Website element actions, use a Widget channel, and mark up the required page elements |
| Send separate messages to other leads or dialogs | Configure Messages to other recipients and describe the sending condition in the agent instruction |
Dependent settings may stay hidden until their parent capability is enabled. For example, pending response cancellation and operator drafts are shown only with AI processing enabled. Permission to skip individual replies and preparation of operator drafts are enabled independently. Check the settings in the test chat, then publish the changes for live dialogs.
Reply mode
First, use the Processing mode field to choose what the agent should do:
- Customer conversation enables AI processing and delivery of the final reply to the client.
- Background processing keeps AI processing and available tools enabled but prevents delivery of the final reply to the client. Selecting this mode turns off preliminary replies and operator draft preparation.
- Metrics collection only disables AI processing and enables metrics collection. Ordinary messages no longer run agent tools, including segment actions. Preliminary replies, skipping individual replies, and operator drafts are also turned off.
Processing mode does not assign the agent to a dialog. Configure autostart, channels, and the assignment role separately. To use tools in the background, select Background processing, not Metrics collection only.
After selecting a mode, check the individual settings below:
- what to show in the widget while processing;
- show the response while it is being generated;
- analyze messages and perform actions with AI;
- forbid sending the response to the client;
- selective answers;
- operator reply draft;
- cancel a pending reply if a project operator responds first;
- cancel a pending reply if an automation responds first;
- preliminary answers;
- reply on segment subscription.
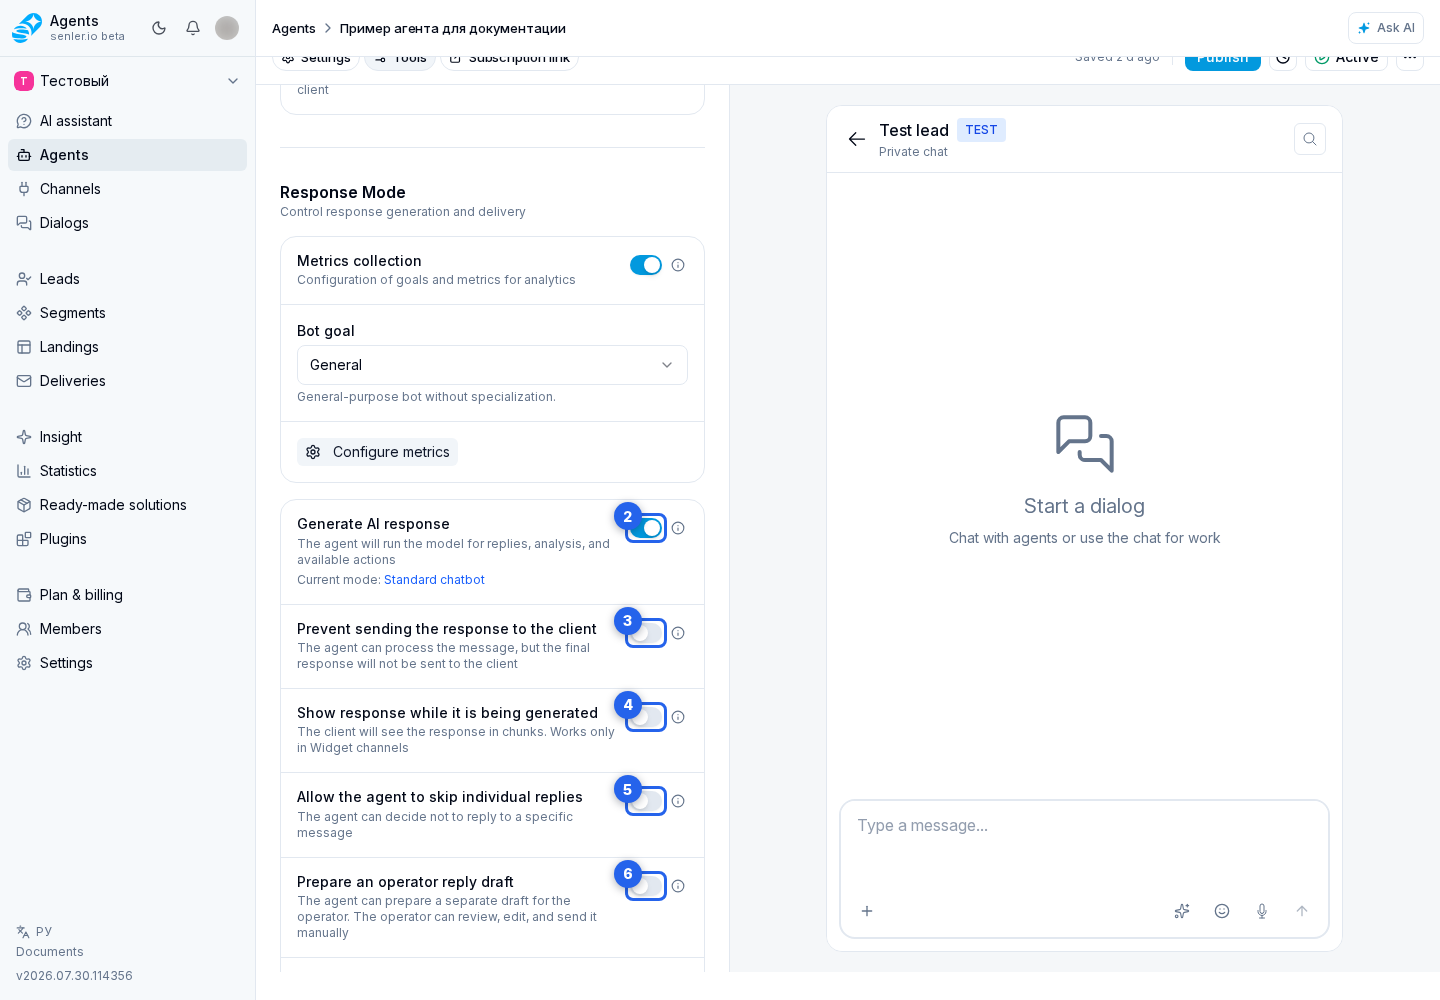
Widget behavior
The What to show while processing field controls what a website visitor sees before the response appears:
- Reasoning stages shows safe, understandable statuses such as “Thinking…”, “Searching for information…”, or “Creating an image…”, without tool requests, tool results, or internal reasoning;
- “Agent is typing” status keeps the regular typing indicator without naming the current stage;
- Do not show hides both indicator variants.
Reasoning stages is selected by default. This setting applies to the website widget and takes effect in live dialogs after the agent draft is published.
The Show response while it is being generated toggle solves a different task: it displays the response text in parts as it is created. It can be combined with any processing indicator option. Progressive output is unavailable when AI response generation or client response sending is disabled.
Generate AI response
Analyze messages and perform actions with AI enables the model, response preparation, and available tools. Delivery of the final reply to the client is configured separately. If AI processing is turned off, ordinary messages are processed only for enabled metrics; granting segment access alone does not run segment actions.
Forbid sending the response to the client
- if disabled, the agent response is sent to the client normally;
- if enabled, the message can be processed, available tools can run, and the result is saved in the cabinet, but the final response is not sent to the channel or widget;
- useful for testing, moderation and scenarios where an operator should review the result first.
Show response while it is being generated
- the answer appears in parts;
- works in the Senler AI cabinet and website widget;
- does not replace the stage indicator shown before the text or between lengthy operations.
Selected answers
- some messages can be left without an automatic response;
- useful if not every message requires a reaction.
Operator reply draft
- enabled through Prepare an operator reply draft when AI processing is on; permission to skip individual replies is not required;
- the automatic client-facing reply may be skipped, while the suggestion is saved only for the operator;
- the client does not see the suggestion;
- the suggestion should be ready client-facing text, without service headings such as "Client reply:", "Template:" or explanations for the operator;
- the reason for the suggestion is only for the operator and processing history, the client does not see it;
- the suggestion may include text and prepared attachments from agent tools;
- in the dialog, the operator can send the suggestion as is, move it into the draft, edit text and attachments, or discuss the suggestion with AI;
- image links in suggestion text are not treated as attachments: an attachment must be prepared by an agent tool or added by the operator;
- the suggestion itself already means the automatic client-facing response is not sent, so there is no need to separately skip the response only for that.
Preliminary answers
- short message before lengthy processing;
- useful for long queries, image generation, external queries and waiting for tools.
Reply on segment subscription
When the agent is assigned to segment members, Reply on segment subscription sends a separate greeting after a subscription without an incoming message: through a landing, direct link, or manual addition. The subscription event is saved in the private dialog history and passed to the agent as the current context. If the setting is disabled, this kind of subscription does not itself trigger a reply.
This setting is enabled by default for a new agent and is nested under Analyze messages and perform actions with AI. When AI processing is disabled, a separate subscription reply is unavailable as well.
A subscription by keyword or the Any message rule happens while an incoming message is being processed. The agent replies to that message, so the separate subscription reply setting does not affect this scenario.
Messages to other recipients
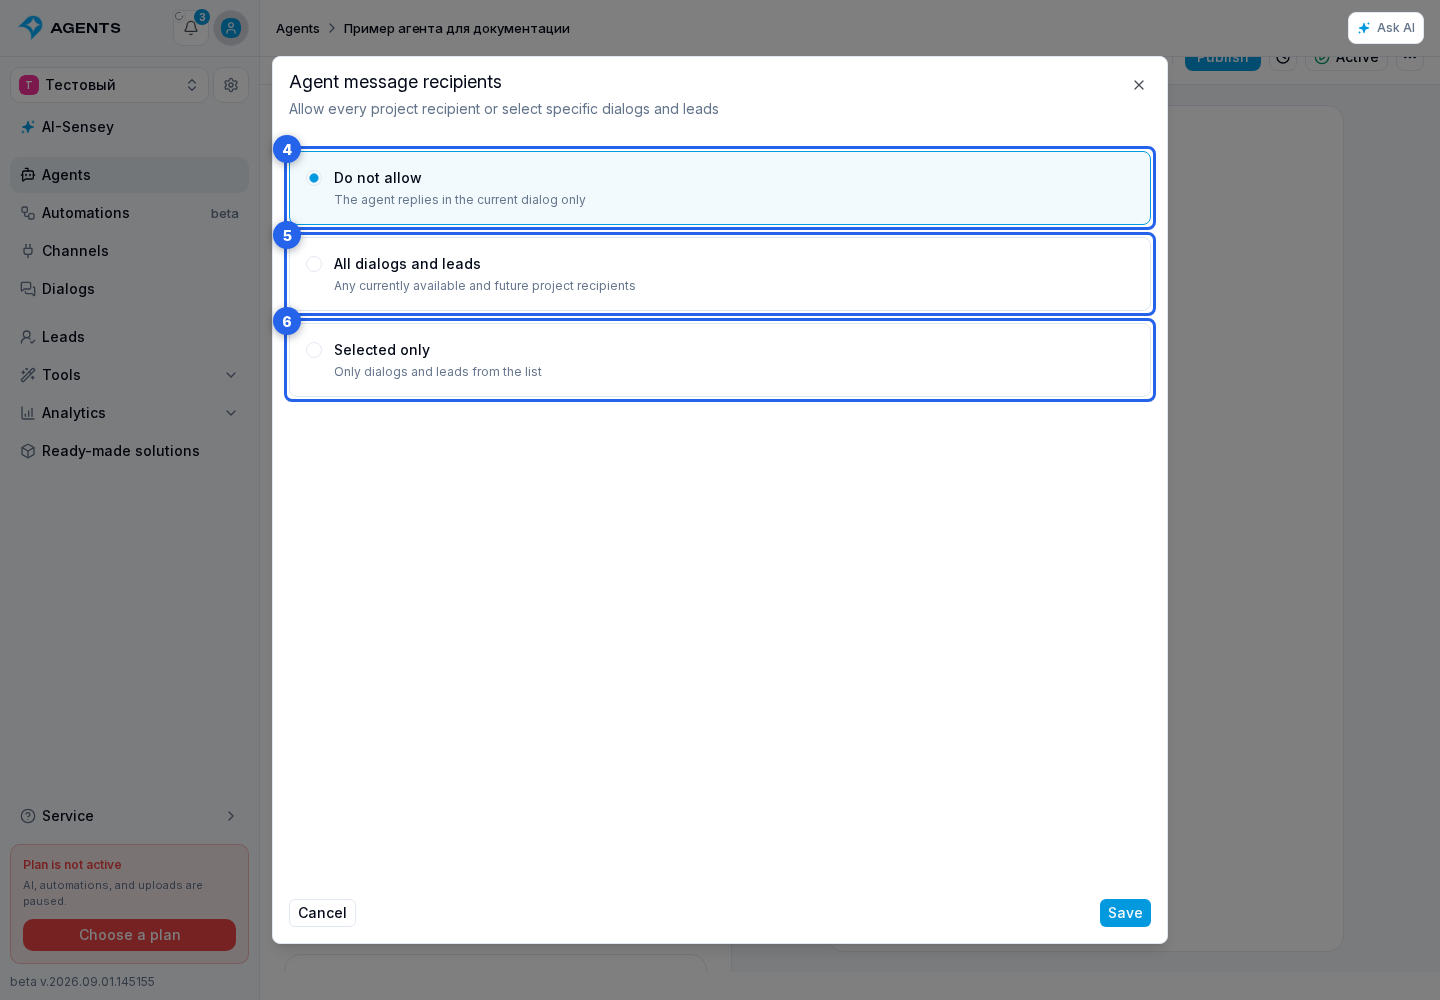
The Messages to other recipients section controls whether an agent can send a separate message to another dialog or lead while processing the current request. The default is Do not allow, so the agent responds only in the current dialog.
Select Configure. In the recipient selection dialog, choose a mode:
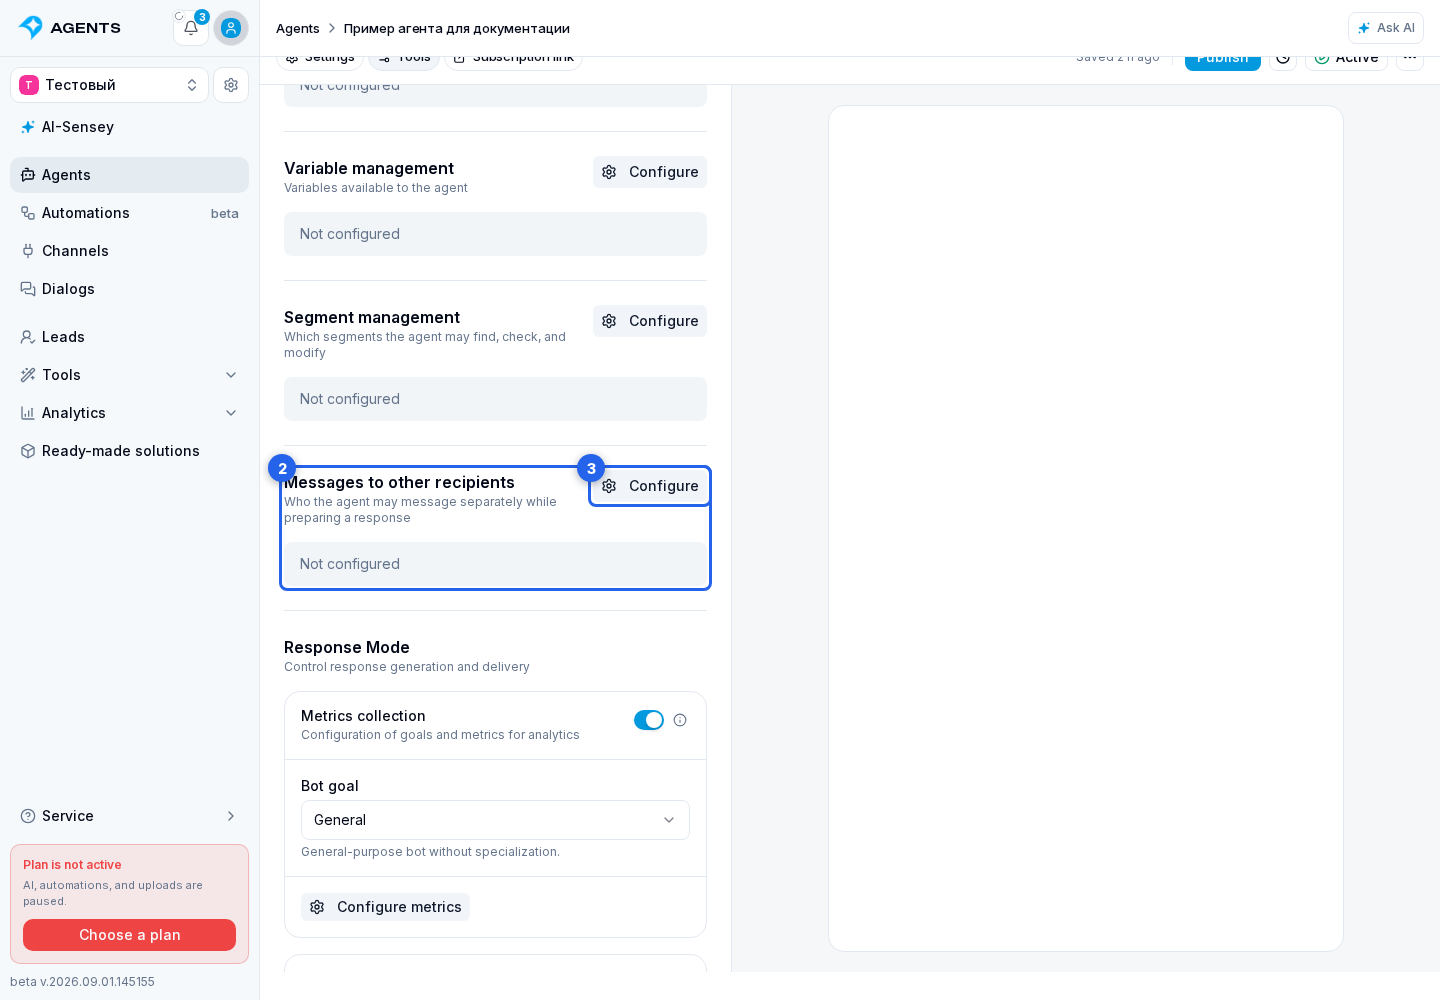
- Do not allow disables separate messages;
- All dialogs and leads lets the agent search recipients that are available now or created later in the project;
- Selected only exposes only the dialogs and leads you allow. You can select up to 200 recipients in total.
In Selected only mode, switch between Dialogs and Leads, filter by channel type, and use the name, username, or ID search. Select the required recipients, then select Save.
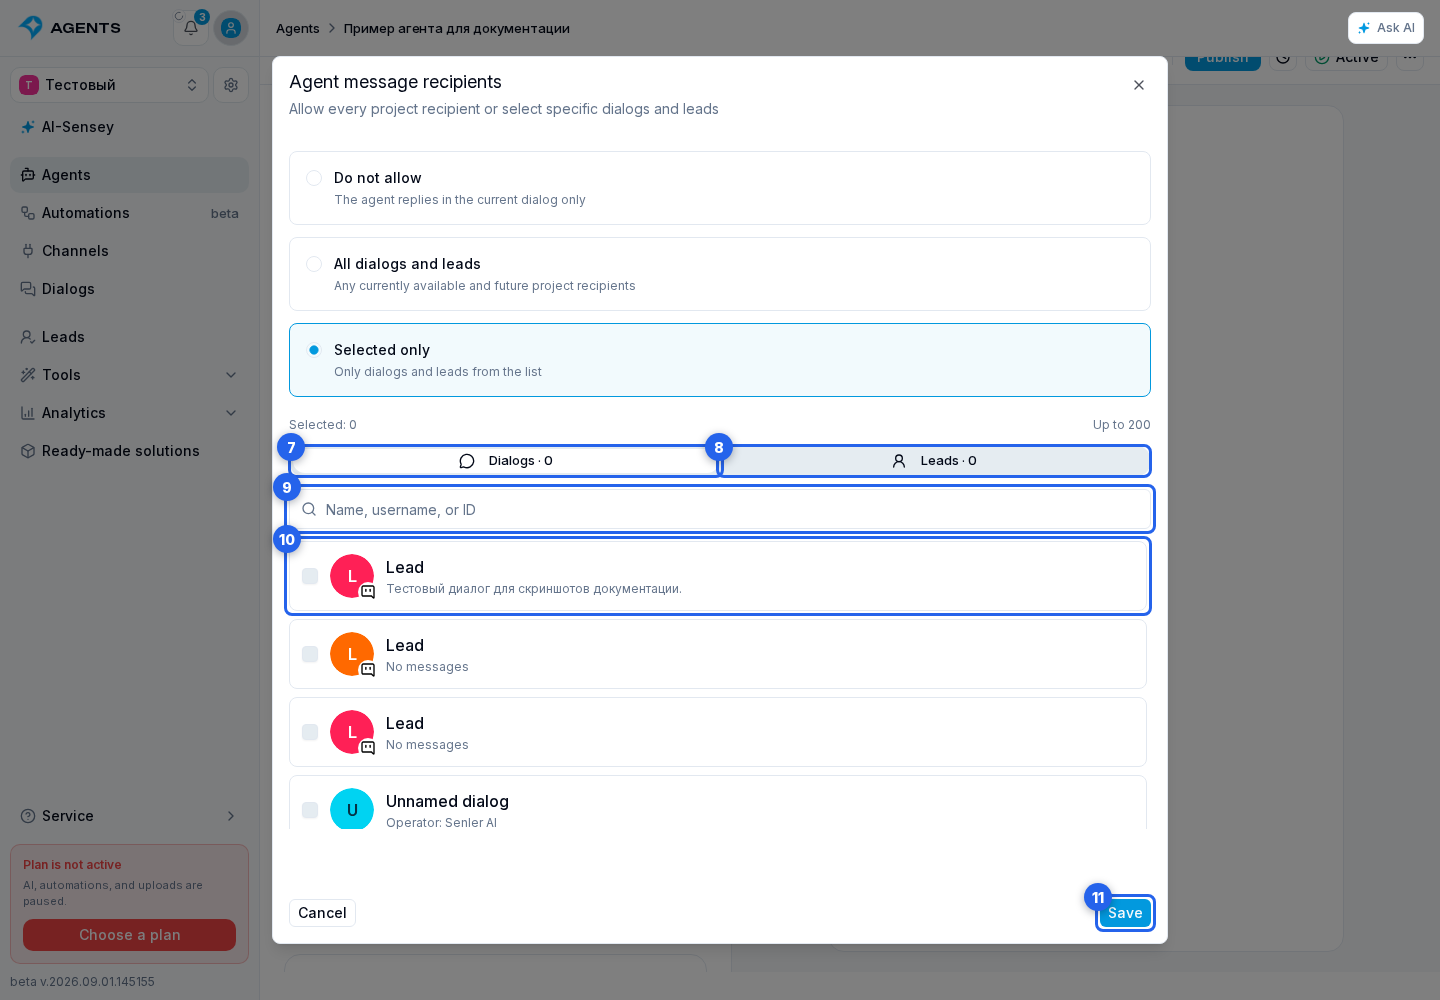
The current dialog is not duplicated in the recipient list because the regular agent response already goes there. For a selected lead, Senler uses an existing private dialog. If none exists, a new private dialog can be created for Telegram, VK, MAX, Discord, and the website widget. For Email, Avito, and StreamVi, the agent can message a lead only through an existing dialog.
A separate message can contain text. Attachments are available when at least one agent capability for creating or sending files is enabled; buttons are available when Buttons is enabled and the recipient channel supports them. These settings define access boundaries only. For example, the instruction can define a manager handoff: when the customer asks to be contacted, the agent selects the allowed Sales recipient and passes the customer's name, contact details, and a short request summary.
Changes take effect in live dialogs after the agent draft is published.
Plugins
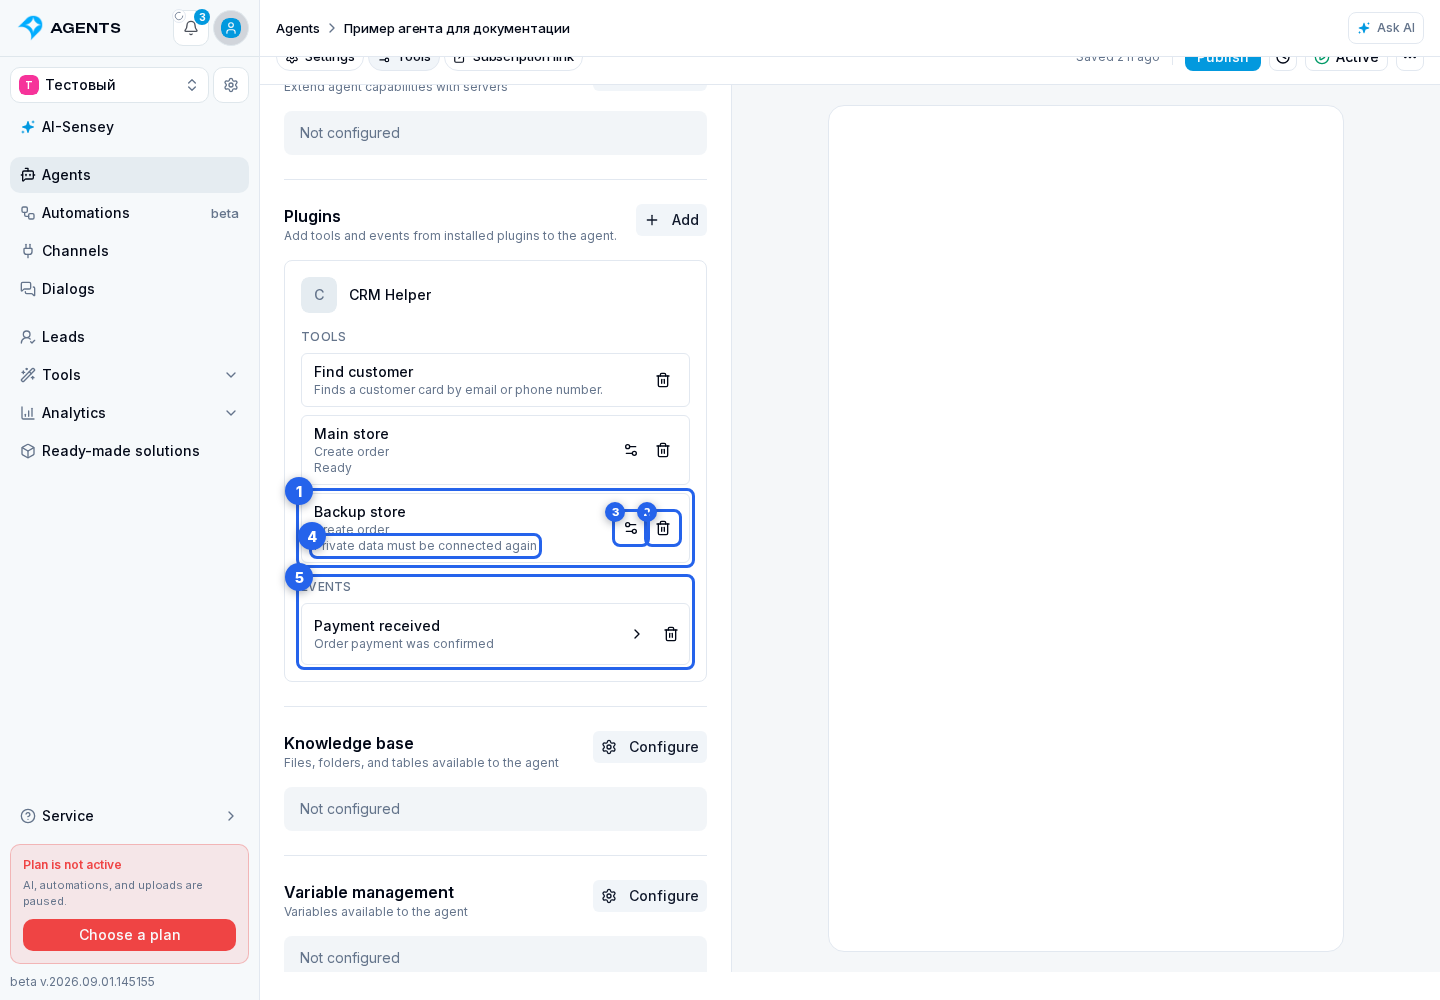
After a plugin is installed, its actions become available in the Plugins section on the Tools tab. Added resources are grouped by plugin, with Tools and Events shown separately inside each group. Names and descriptions use the cabinet language.
A tool or event can also be selected through the @ button in agent instructions: open Plugins and the required application. A regular available tool is added together with its tag. A configurable tool opens its configurator first, while an event opens the dialog describing its data; the tag appears after a successful addition. Next to the tag, clearly state when the agent should use that resource.
The section is visible for a new agent but asks you to save the agent first. After saving, select Add. In the shared Add from plugins dialog, expand the required plugin and select a tool or event.
Before showing options, the cabinet refreshes installed plugin resources. If one MCP server does not respond, that group's tools show a temporary unavailability warning and are not offered for a new addition, while saved bindings remain on the agent. Events from other available plugins continue loading independently. Reopen the picker later; there is no need to remove and add saved instances again.
If the dialog says that all available tools and events have already been added, more choices appear after another plugin is installed, the developer publishes new resources, or an existing tool or event is removed. A tool that allows multiple additions remains available.
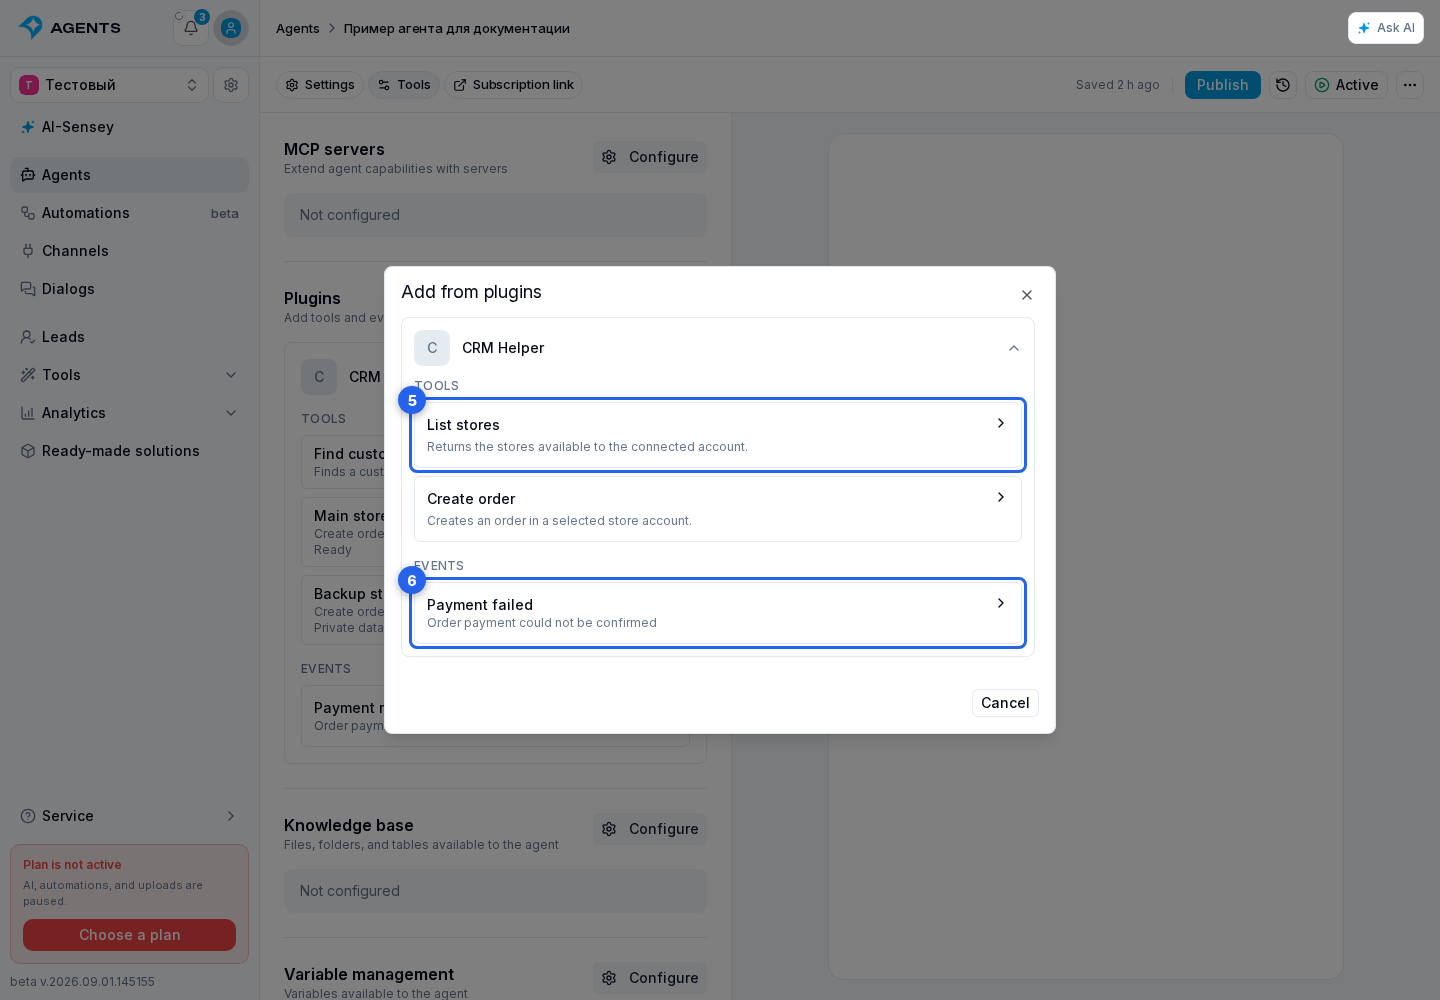
Regular tool
After selection, a regular tool is saved immediately as an agent tool; there is no separate Save button and the general agent draft does not need to be published. The remove action immediately removes it from the agent.
Configurable tool
After selecting a configurable tool:
- Complete the plugin form in the embedded configuration dialog.
- Select Add. The title and parameters are saved as a separate tool instance for this agent.
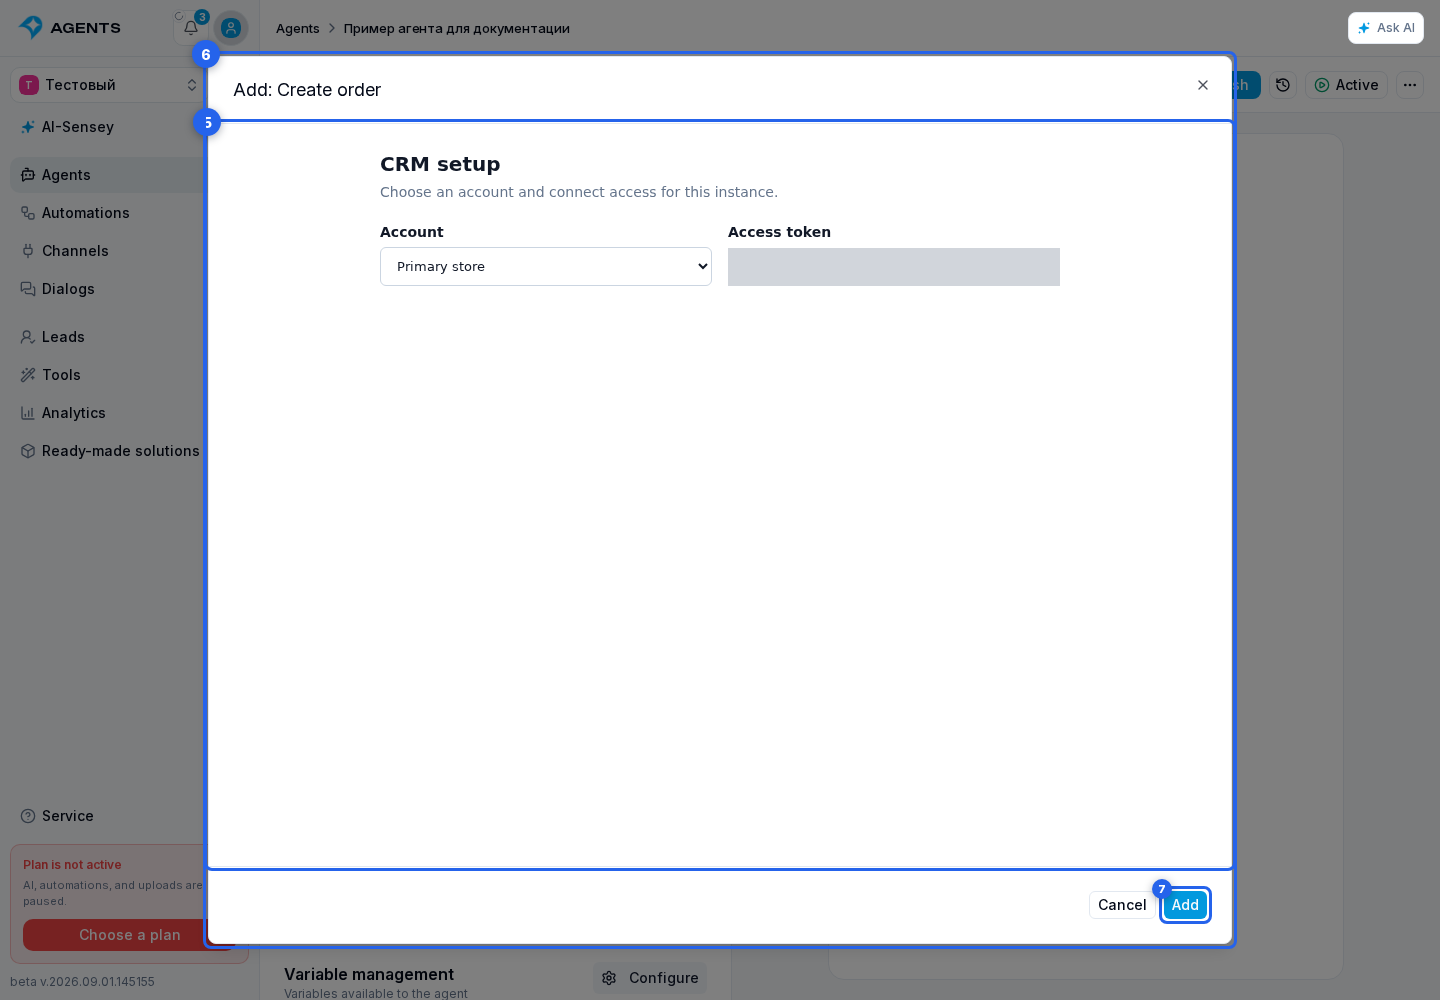
If selecting the button shows The app page is still loading, wait for loading to finish and select the button again. If the page is already visible but the application does not answer the save request within 20 seconds, retry; a repeated failure means the plugin configurator needs to be fixed.
The plugin author decides whether the same tool can be added more than once. When allowed, create separate instances for different stores, accounts, or permission sets, for example. Each instance has its own title, settings, and private data. When multiple additions are not allowed, that tool disappears from the selection dialog after its first instance is created.
The configure instance action reopens the plugin form. The remove action immediately removes the instance from the agent, so use it only when the action should no longer be available.
An instance status of Ready means that it is available to the agent. Private data must be connected again means that the plugin is missing a required token, key, or other protected value. Open the instance settings and reconnect it. Until then, the agent cannot see or call that instance.
Review the tool data
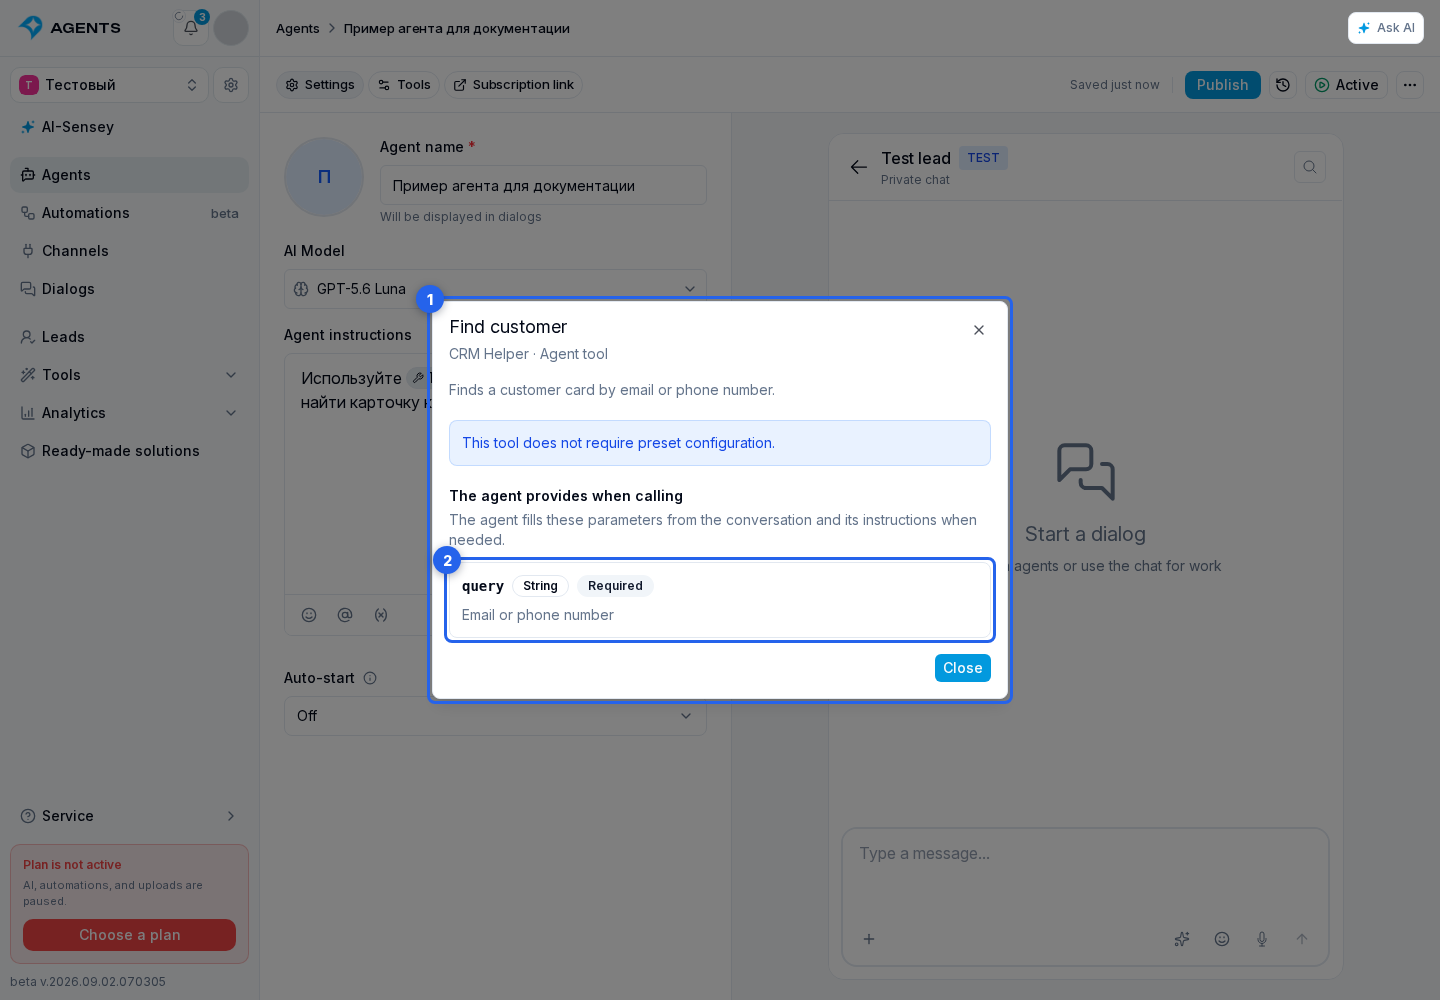
Select a tool tag that has already been added to the agent instructions. This opens the tool details dialog with the application name, the purpose of the tool, and the parameters it accepts at runtime.
Each tool parameter shows its technical name, type, whether it is required, its description, and allowed options when the developer supplied them. A regular tool shows its shared parameter set, while a configurable tool shows the set saved for that instance. If the application provides a configuration form for the instance, Change settings opens it again; Close returns to the instructions.
If Add is unavailable and the embedded-page message is shown, the application developer must fix the setup: a configurable tool requires an enabled embedded page that supports the configurator. The technical contract is documented in the Tools.
If the plugin, its tools, or the installation is disabled, the related actions become unavailable to the agent. This differs from a temporary MCP refresh error: saved bindings are not removed, and the cabinet shows a warning that the user should retry later.
Plugin event
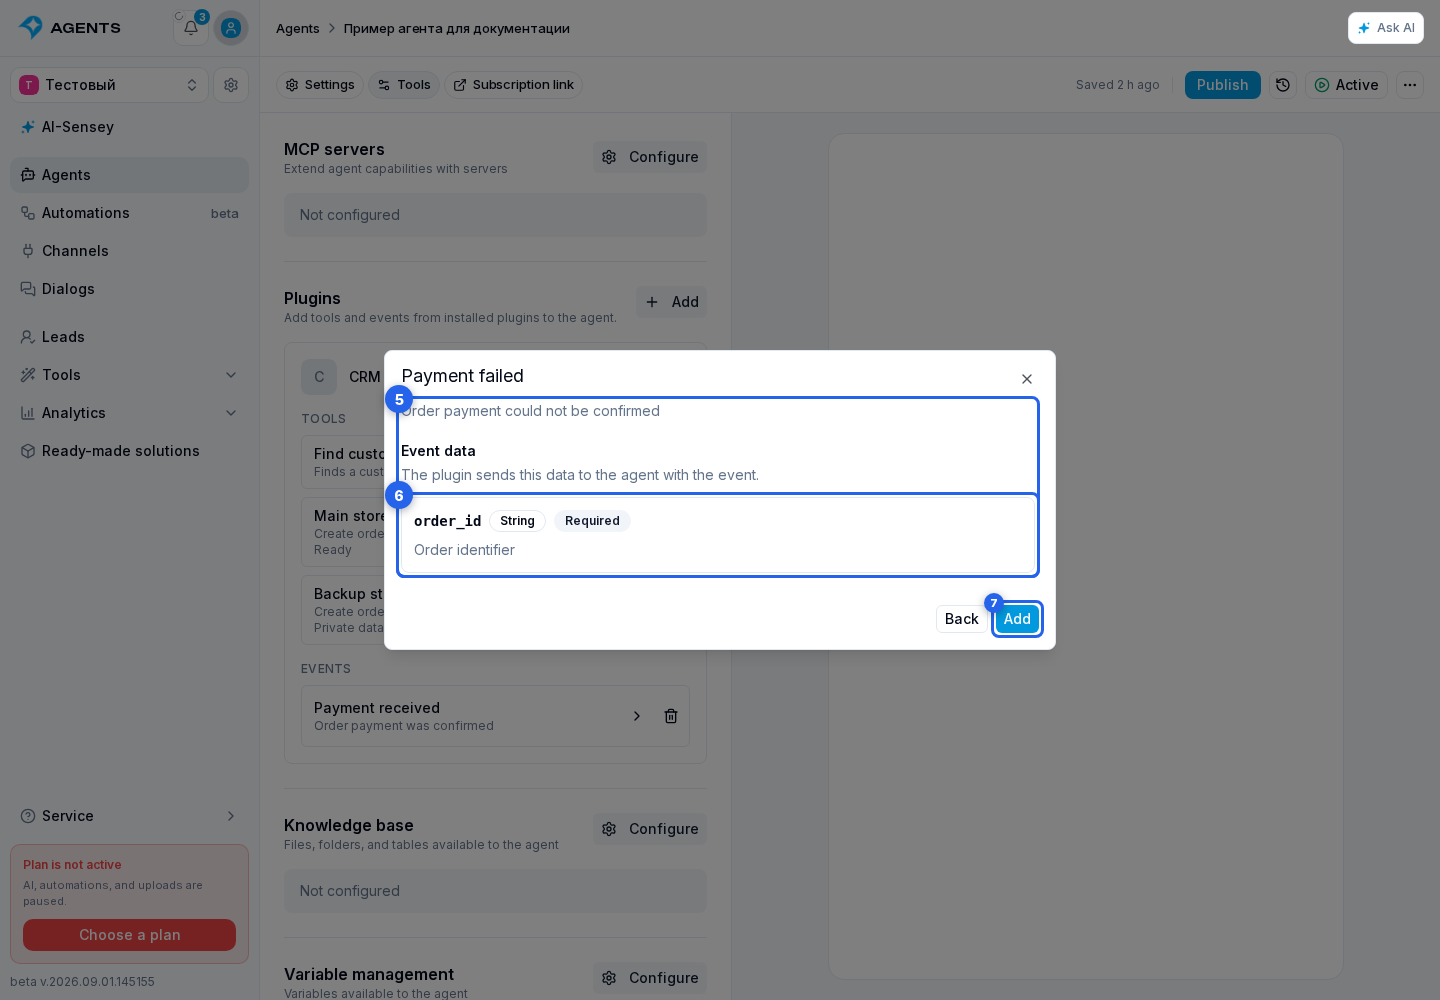
Use the Events group to add events that the agent should respond to. A plugin can start the agent in the original dialog only for added events.
- In the shared add dialog, expand the required plugin and select an event.
- In the event details, review what the event means and which data the plugin will send to the agent. Then select Add.
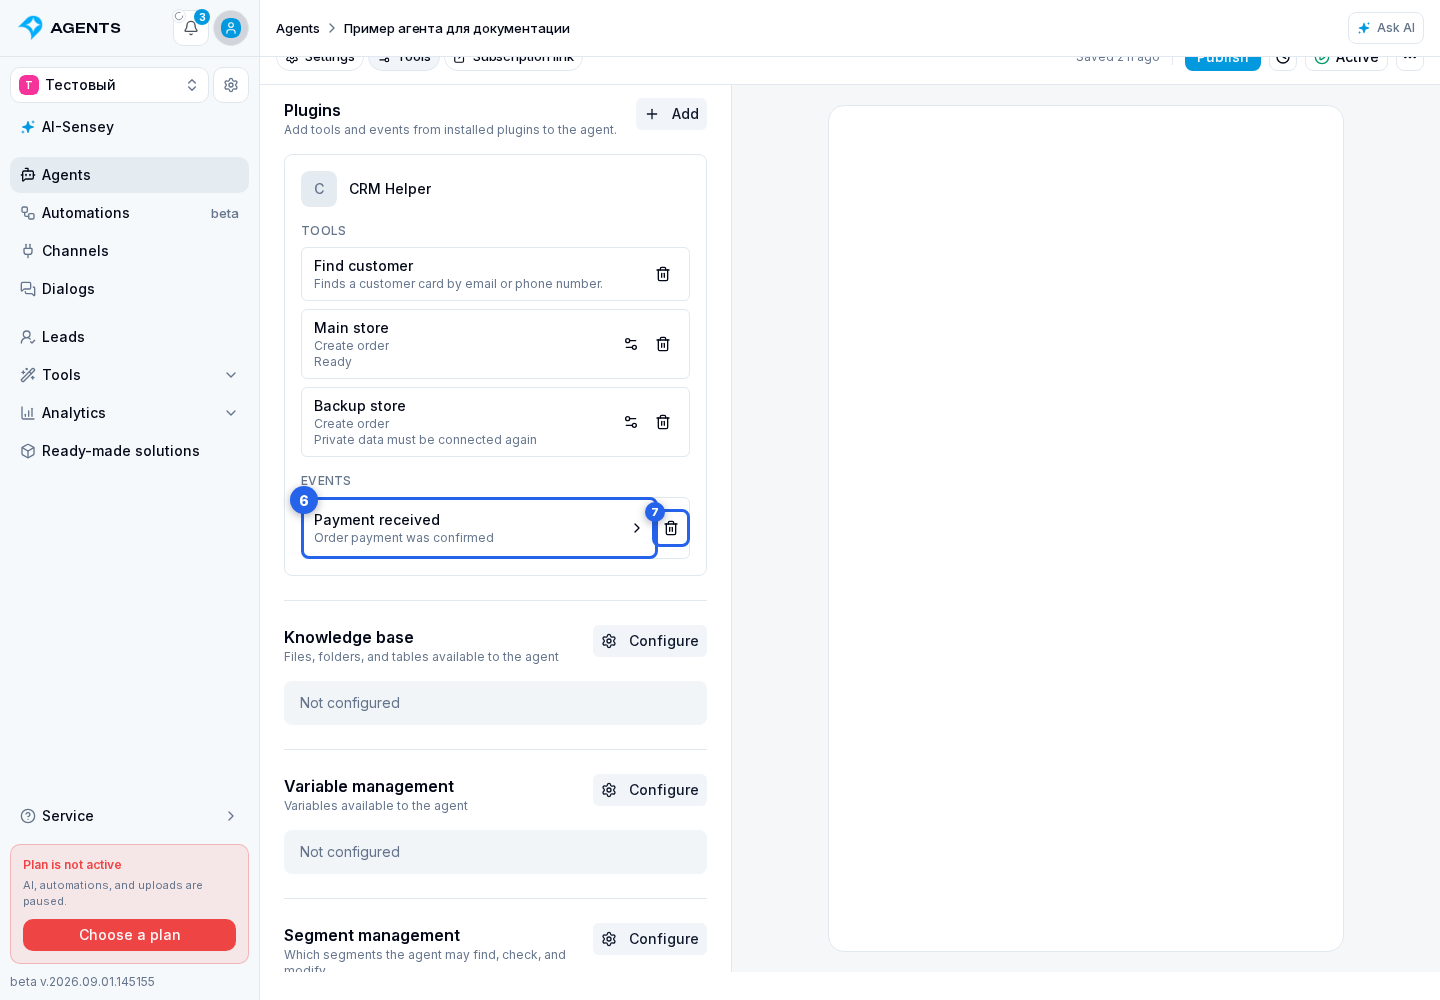
- The event appears in the plugin group as an agent subscription. Select it to view its details again. The remove action immediately stops this agent from responding to the event.
If an operator replies first
A message from a project member or a sender marked as a Project operator does not trigger the agent. If the agent is already preparing a response to the client's previous message and an operator replies first, the pending AI response is canceled by default. This prevents the client from receiving consecutive replies from both a person and the agent.
The cancellation affects only the response that was still being prepared at that moment. The client's next message is processed under the regular agent assignment rules again.
Cancel a pending reply if a project operator responds first is in Response Mode, enabled by default, and shown only when Analyze messages and perform actions with AI is enabled. If you turn it off, an AI response that has already started may arrive after the operator's message.
Change the setting in the draft, save it, and publish a new version. Until publication, live dialogs continue to use the previous value. You can verify the effective value in the published version dialog.
How to choose a lead or space, how this mark differs from a project member role, and how to verify the result safely are covered in Project Operator and Agent Replies.
If An Automation Replies First
If an automation sends a dialog message while the agent is preparing a reply to the client's previous message, the enabled Cancel a pending reply if an automation responds first setting stops the pending agent reply. The client receives the automation message without a duplicate agent response immediately afterwards.
The setting is enabled by default, appears under Reply mode, and is visible only when AI response generation is enabled. It applies to live dialogs; agent testing does not cancel a response because of a test automation message.
If you turn it off, an agent response that has already started may be sent after the automation message. Save and publish the agent draft for the change to reach live dialogs.
Input recognition
- speech recognition;
- image recognition.
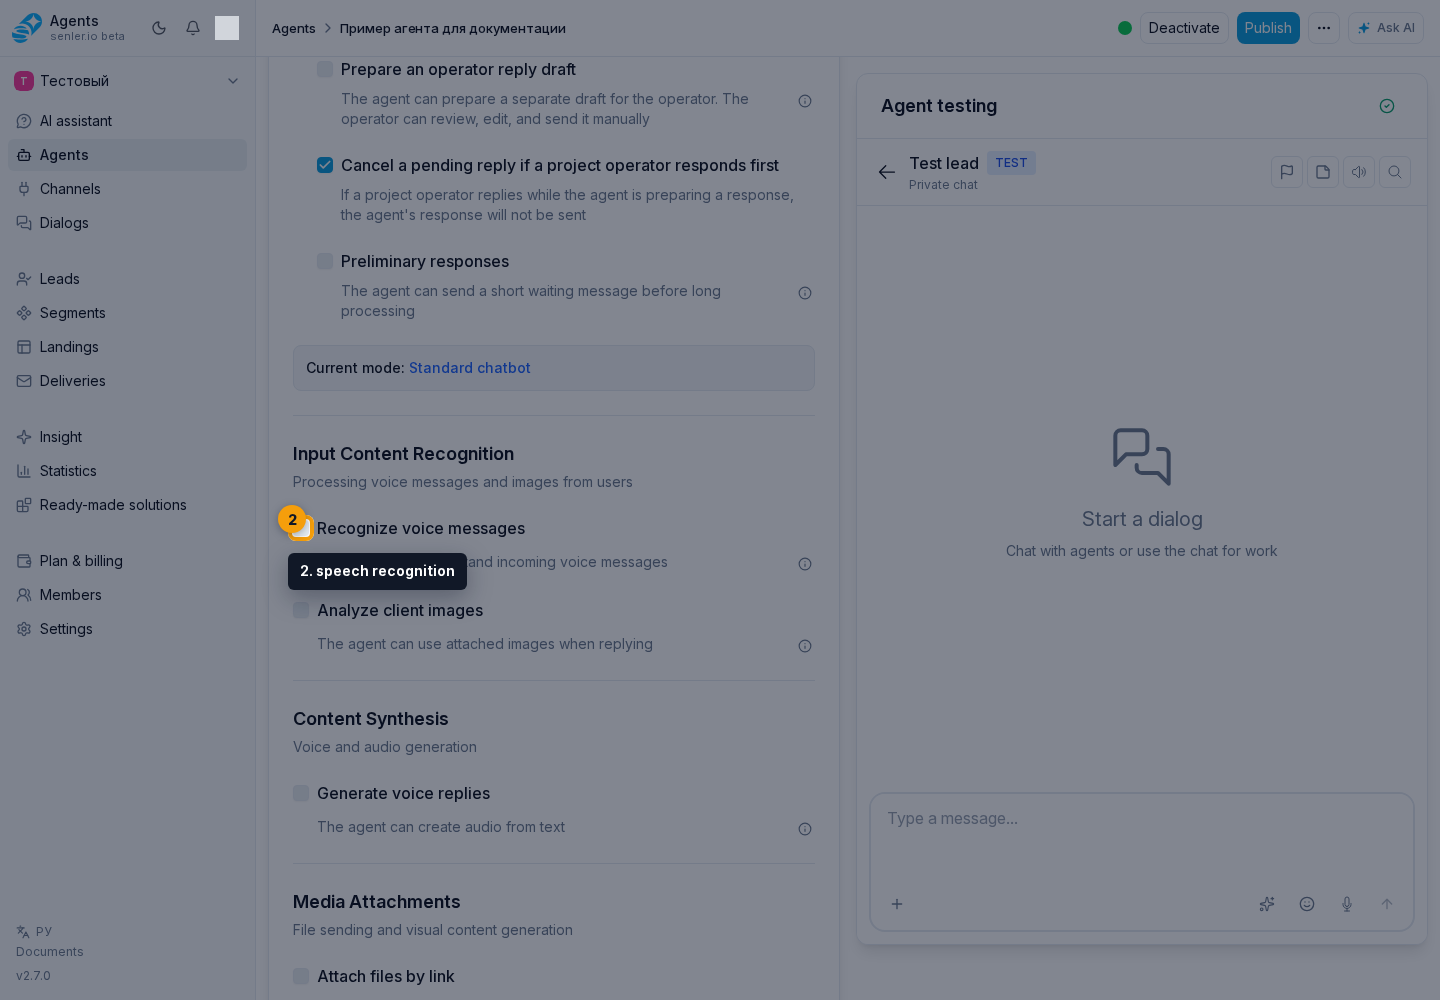
Speech recognition
- allows you to process voice messages;
- the recognition model is selected.
Image recognition
- allows you to understand pictures, screenshots and images if the channel transmits attachments.
Content synthesis
- generation of audio/voice-over response;
- voice cloning from an audio sample;
- regular voice-over and voice cloning use separate compatible model selectors.
Voice cloning
Enable Clone a voice from an audio sample to let the agent speak text in the voice from a voice or audio message in the current dialog. The user does not need to copy an attachment identifier: the selected audio sample from the current dialog is passed to the voice-over tool automatically.
If the dialog contains several audio messages, explicitly identify the one to use and the text to speak. Before starting, confirm the right to use that voice in the same dialog. For example: “I confirm that I may use this voice. Say ‘Thank you for contacting us’ in the voice from the latest voice message.” The cloning tool does not run without explicit confirmation. The sample must belong to the current dialog, be a voice or audio attachment that is ready for processing, and be no larger than 15 MB.
After the first successful voice-over, the selected sample becomes the current sample for this agent in that dialog. You can then ask, “Speak another text in the same voice,” without selecting the message again. Identify another sample to switch voices. A sample from another dialog cannot be used. Speed can be set for regular voice-over with a preset voice, but not for cloning from an audio sample.
After enabling the capability, the Voice cloning model field appears. If no model has been set yet, the cabinet selects the first available compatible model; when several options exist, you can choose another. An empty list means that no currently available model supports voice cloning, so the capability cannot be prepared for use.
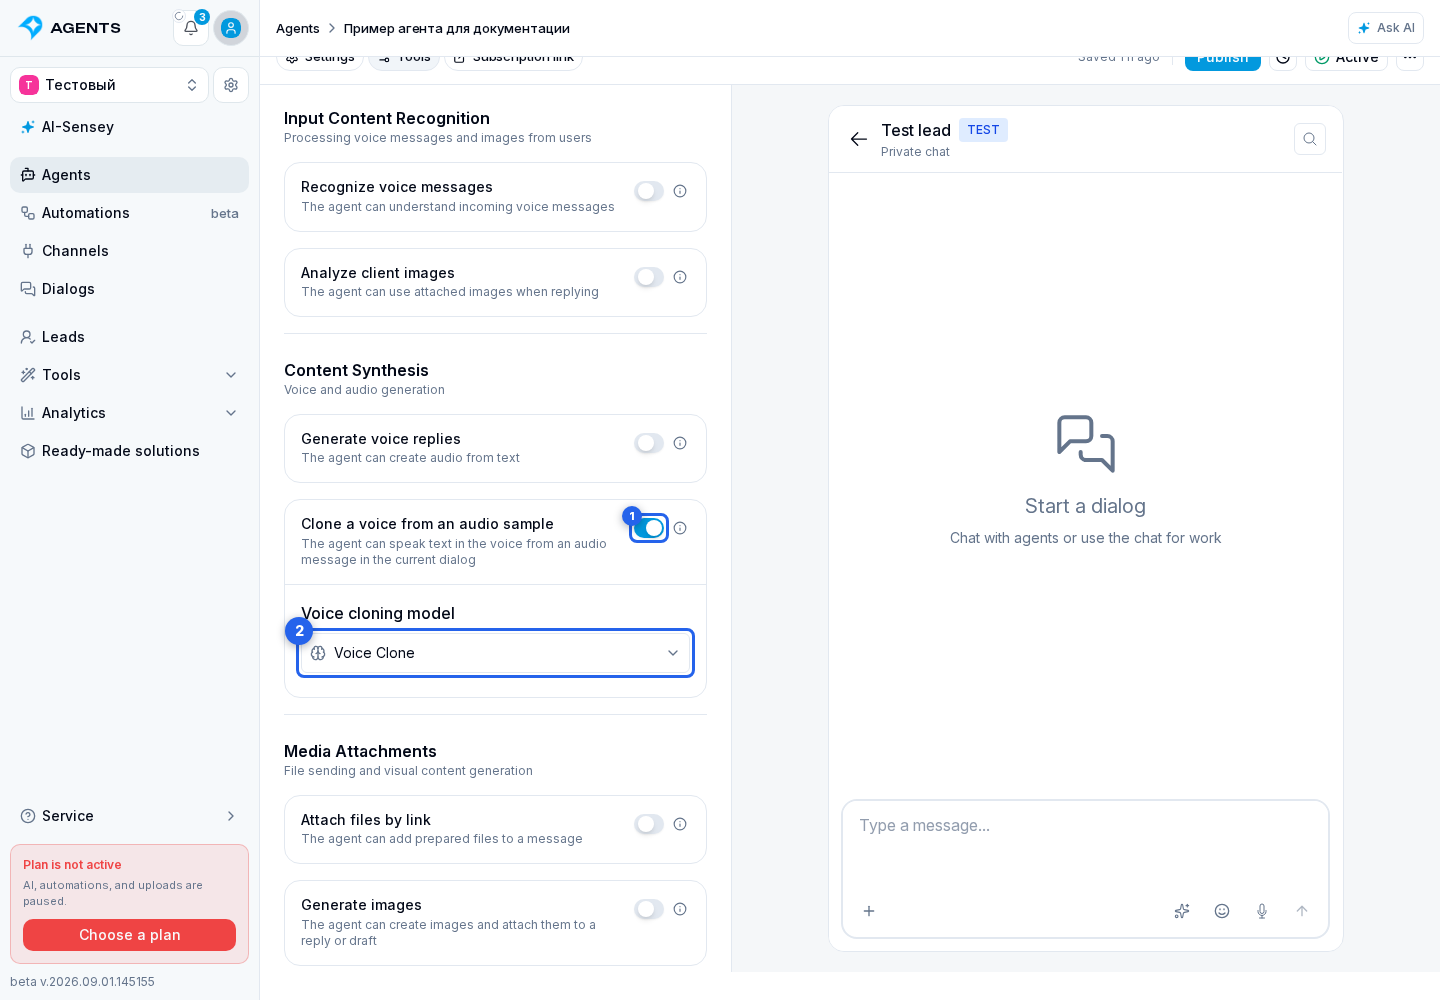
You can verify the change against the draft through agent testing. The published version dialog separately shows whether cloning is enabled and which model it uses. Publish the draft before using it in live dialogs.
Use a voice only with its owner's consent. The agent should clone a voice only after an explicit user request that confirms permission to use the sample.
Media and attachments
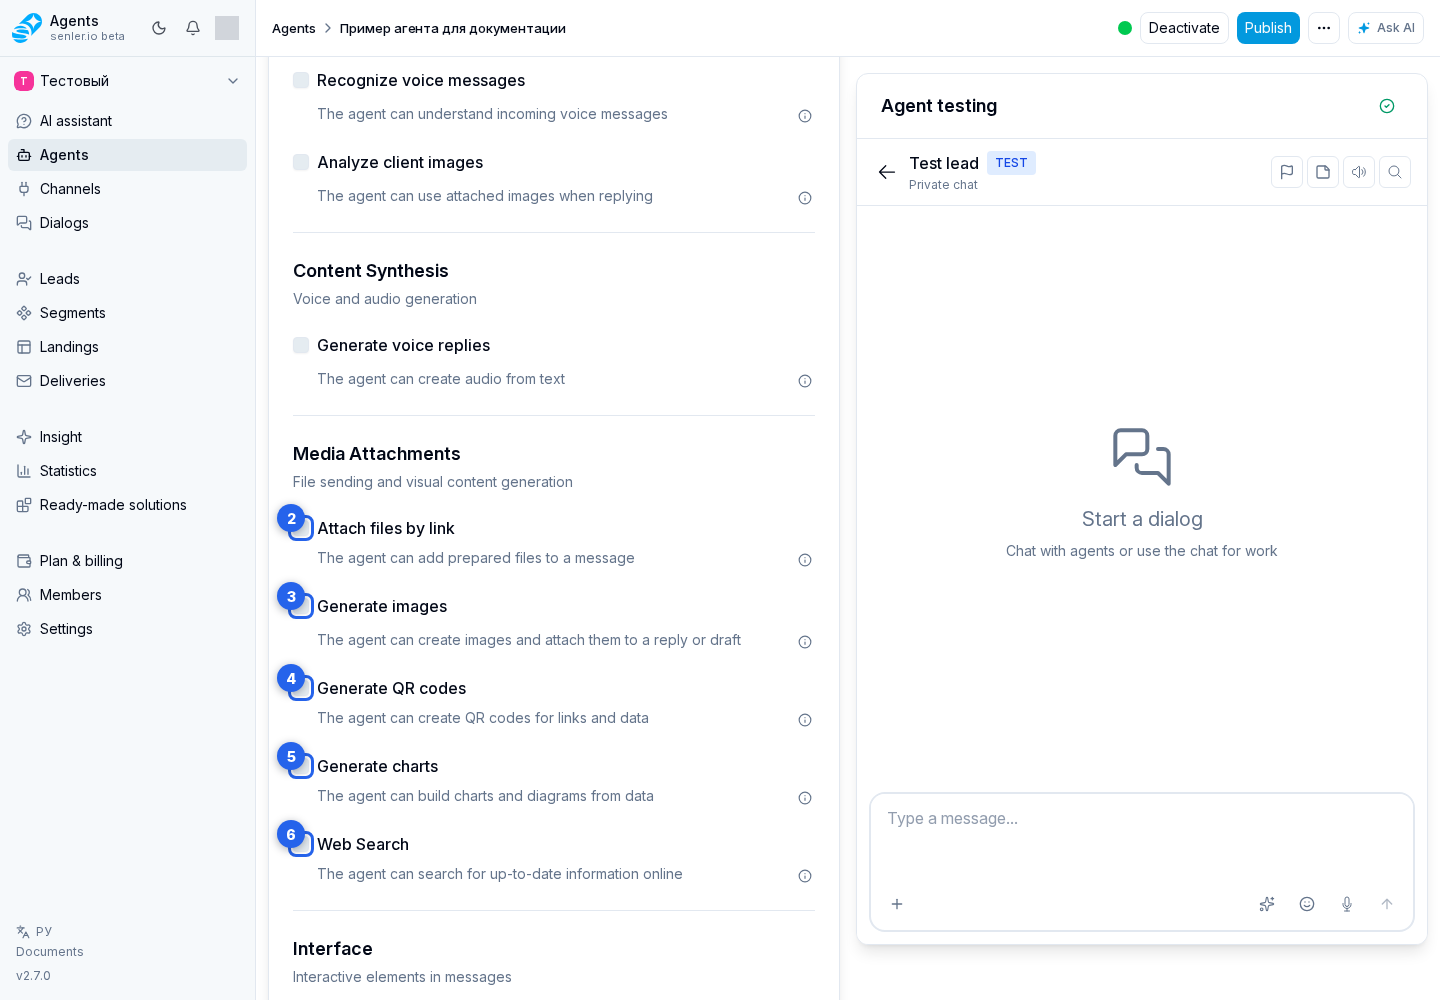
- custom URL attachments;
- image generation;
- generation of QR codes;
- generation of charts;
- web search.
Attach files by link lets the agent download a prepared file of up to 50 MB from a public HTTP or HTTPS address and add it to the current reply. A link that requires sign-in or special headers will not work. The same capability lets the agent reuse ready attachments from the current dialog; attachments from another project or dialog are unavailable. Up to 10 files can be reused in one reply.
Image, audio, QR code, and chart generation first creates an attachment. The agent decides whether to add it to the current final reply or keep it for a later action. The tool itself does not send a separate client message without the agent's final text.
A generated image is attached to the agent's response, but it does not replace an image in a landing or another entity by itself. If the image must be used in an object being created or edited, explicitly ask the agent to place it in the required field after generation.
Capability models
Some capabilities use a separate model:
- speech recognition uses a recognition model;
- image generation uses an image model;
- audio generation/voice-over uses a voice model;
- voice cloning uses a model that supports cloning.
After a capability is enabled, the cabinet normally selects the first available model of the required type. Check that choice before publication. If no compatible model is available, the field has no working option and the capability cannot be saved as fully configured. Image recognition is enabled with a separate checkbox; this form section does not show a separate model selector for it.
Tool and media billing
Model cards show credit cost depending on the model type: per response, per image, per 1M tokens, per 1K characters, or per minute. For image-generation models, the first comparison scale is Quality instead of Reasoning; the card price is a per-image credit range across the available quality, aspect-ratio, and resolution combinations. For other modern models, price may account for text, images, audio, cached tokens, and final generation volume.
When an image generation, audio generation, speech recognition, or image analysis tool runs, event history shows the work of the corresponding tool. Charges then appear in credit history and spend operation details.
Interface
- buttons in answers;
- actions with site elements through the widget;
- taking message reactions into account.
Actions with site elements
- Website element action settings are in the agent form: Tools -> Capabilities -> Interface -> Actions with site elements;
- enables the tool for highlighting and acting on elements of the open page;
- works only in Widget channel dialogs;
- the widget must be installed on the site, and the required elements should be marked up according to the guide in the "Widget on the website" section;
- if the checkbox is disabled, site element actions are unavailable, even if the widget and markup are present;
- together with the message, the widget attaches context tags: the open page, project, recommendation, or selected element;
- the page tag is usually labeled with the open page title, and the project tag with the project name;
- acting on an element should happen only after an explicit user request: highlight, scroll to, focus, click, fill, clear, select, or toggle;
- in the dialog, the action card shows execution status: completed, executing, not found, blocked, or failed.
Automation
- passing the support schedule;
- timers and schedule;
- muting the dialog for the duration of the timer;
- detaching the agent from the dialog;
- blocking leads;
- skipping metrics for individual messages.
Mute dialog until timer is shown only when Timers and schedule is enabled: without a timer, there is no event for the mute to wait for.
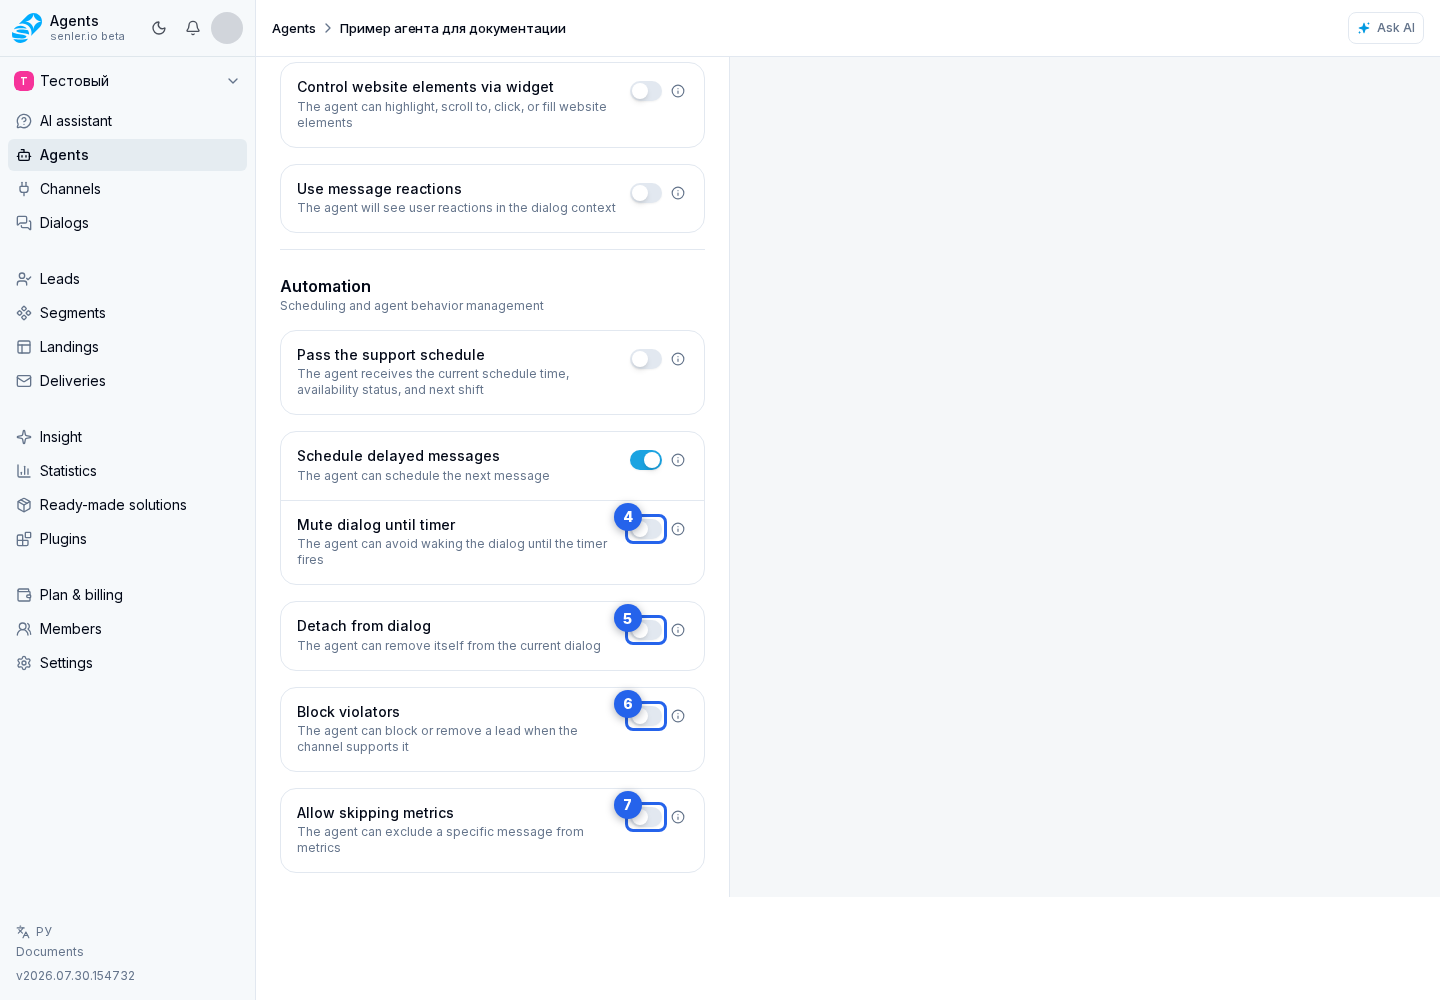
Enable schedule usage so replies take into account the current date and time in the schedule time zone and whether support is working or closed. During working time, the end of the current continuous coverage is used. While support is closed, the start and end of the next coverage are used. A reply can also account for the absence of future assignments.
Overlapping and touching operator assignments are treated as one continuous interval. For example, assignments from 09:00-13:00 and 13:00-18:00 make 18:00 the support end time, not 13:00.
This capability is independent from Use schedule in response statistics in Support settings. The agent checkbox determines whether replies account for working hours, while the project setting controls statistics and SLA calculation. Enable it in the draft and publish the agent for it to apply in real dialogs.
Lead blocking
- can exclude from group chats;
- can block a VK user;
- can add a lead to the blacklist.