
Agent settings
Open the project you need and go to Agents. Select the required card in the list. If the agent does not exist yet, start with manual creation.
The Settings tab defines the agent name and core behavior. On a phone, this tab is the gear icon above the form. Settings for an existing agent are saved in a draft: live dialogs use the published version until you publish the changes.
The editing participants list shows who else has opened or is changing the settings.
Name, avatar, and instructions
Enter an agent name that is clear to your team, such as Sales Manager, Telegram Support, or Request Assistant. The name is required.
For a saved agent, you can replace the avatar through the image next to the name. Use a distinct avatar when a project has several similar agents.
In the agent instructions, describe its role, tasks, communication style, restrictions, procedures, operator handoff conditions, and rules for using data and tools.
The same form contains the Autostart mode selector and the AI model field. The actions menu (⋯) is in the upper-right corner. These settings are covered in more detail below.
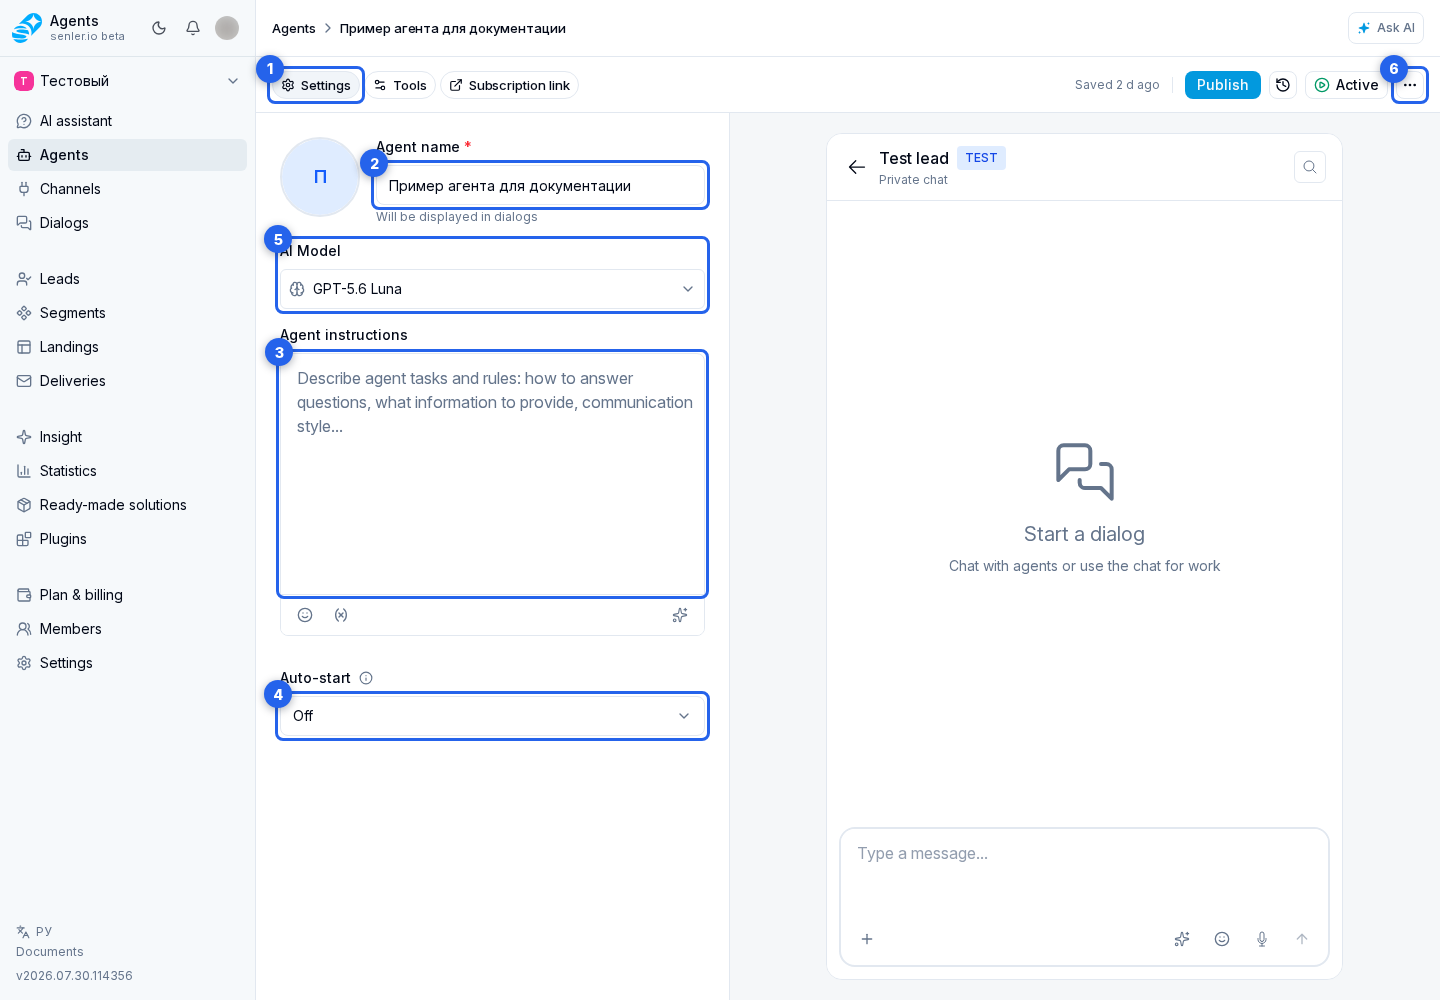
Make the instructions easy to read with short paragraphs, headings, and lists. The editor supports Markdown but does not preserve arbitrary colors and fonts from copied text. Formatting helps readability; write the actual rules in words.
Use Insert variable below the editor to insert data into the instruction text. The dialog has Project, Lead, Dialog, and Lead data tabs. The first three contain variables you have created; the last contains built-in fields of the current lead, such as their name and ID. Value inserts the selected field, while Condition adds two text variants for a present and missing value. See Data and variables in an agent for examples and the difference between this substitution and the agent's access to variables.
The gear at the bottom right of the editor opens Message settings. Enable Hide link previews to keep links in the agent’s replies clickable without a website preview card. The setting applies when sending to channels that support disabling previews, including preliminary replies. It is saved in the draft with other agent settings; publish the changes to apply them to live conversations.
Good instructions answer these questions in order:
- what role the agent performs and who it helps;
- what result the user should receive;
- which data needs to be clarified;
- what the agent must not do;
- when an operator should be called;
- how MCP tools, variables, and metrics should be used.
Data and tool references in instructions
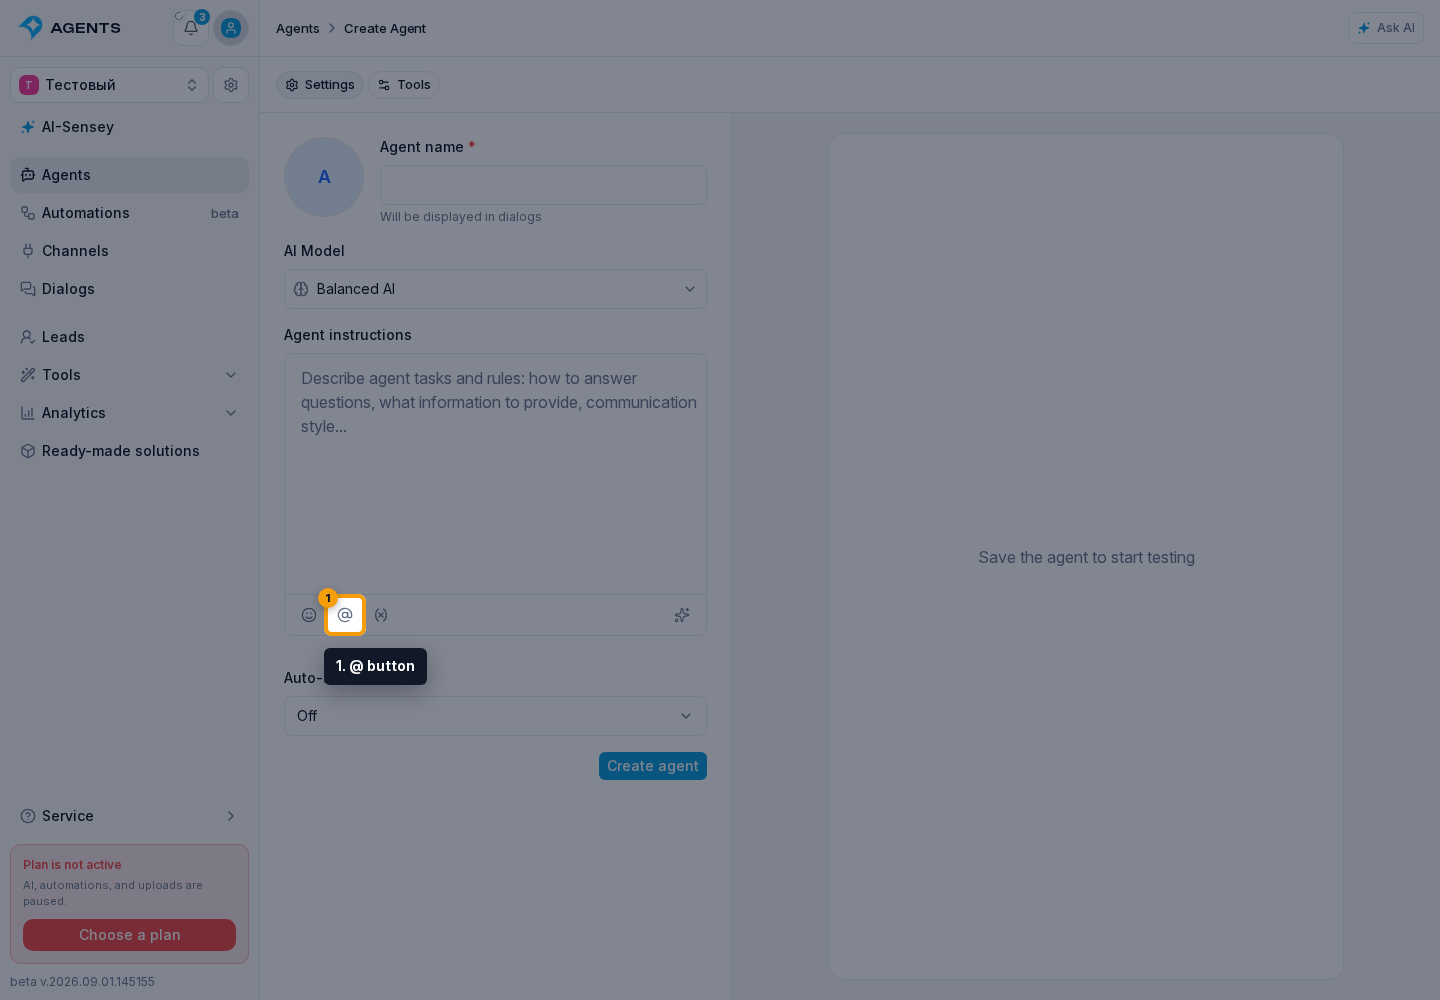
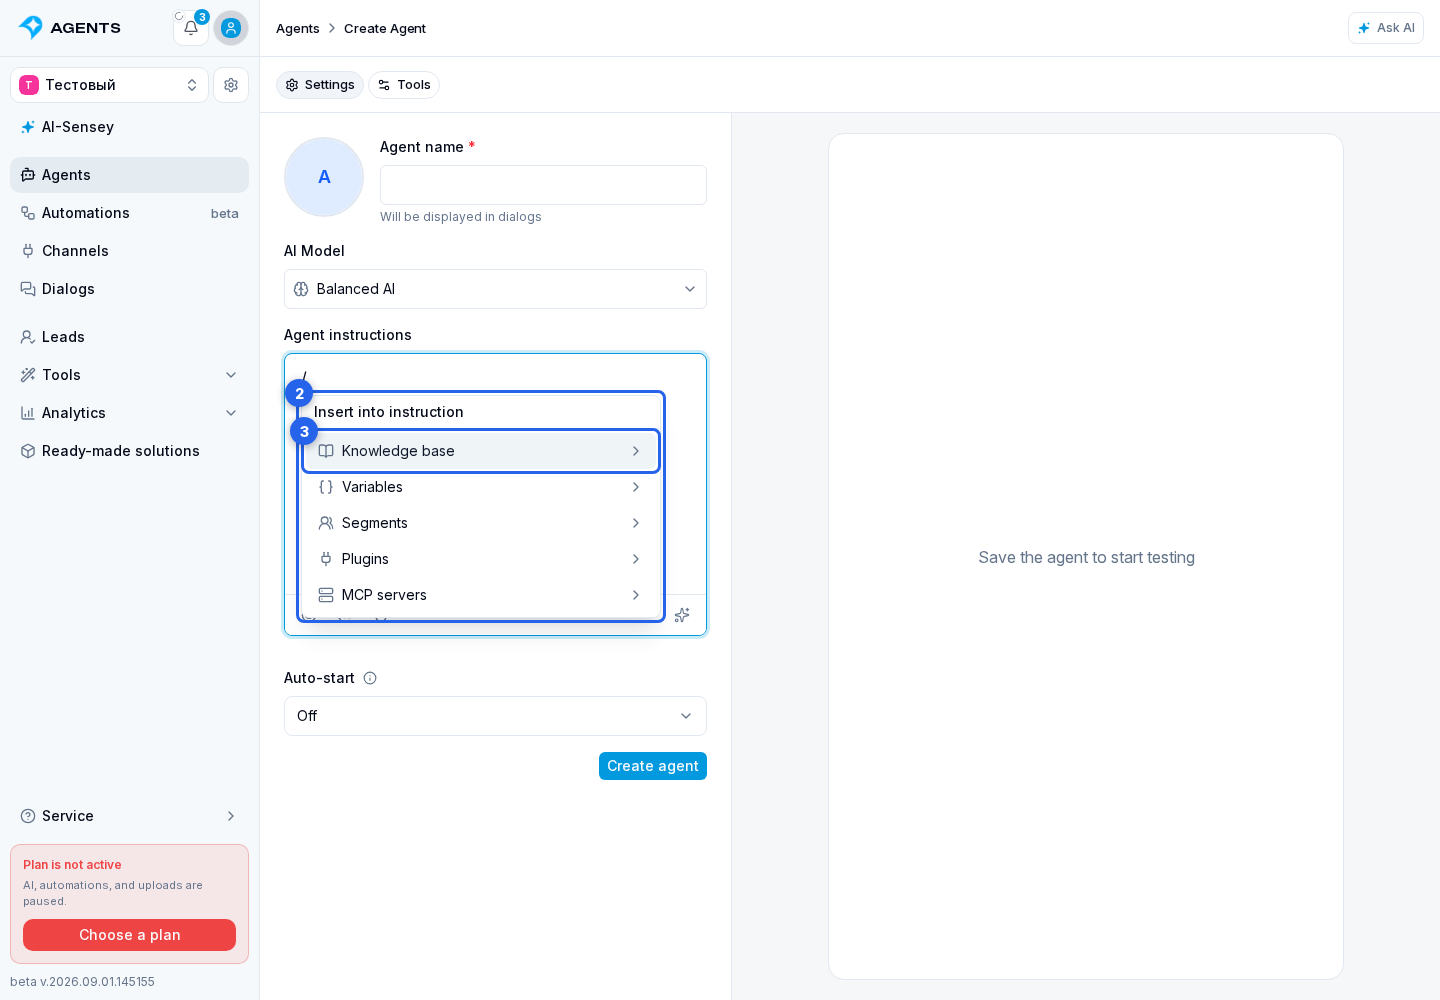
The @ button below the editor opens the unified instruction reference catalog. Typing / or @ in the text opens the same menu. It contains:
- knowledge base materials;
- project, lead, and dialog variables;
- segments;
- installed plugin tools and events;
- MCP servers.
Select a section and then a specific item. A visible tag appears in the instructions. At the same time, the cabinet connects the item to the agent or asks you to finish its setup: for example, it grants read access to a variable, adds a segment, opens a plugin tool configurator, or opens MCP server settings.
A tag is not a command by itself. Next to it, explain when and why to use that material, variable, segment, or tool. For example, start with “To choose a delivery option, use the customer's city from”, then insert the city variable tag.
Choose the reference from the catalog: typing a name alone does not connect the resource. If the agent needs to change a variable as well as read it, separately allow write access. Asking for this in the instructions does not grant permission.
Knowledge base materials in instructions
When a rule or example already exists in the knowledge base, you do not need to copy it into the instructions. Add a link to the material where it is needed in the text.
Open the reference catalog
Place the cursor where the agent will need the material and select the @ button below the editor.
In the reference catalog, choose Knowledge base.
Find and select a material
The material catalog opens. Open a folder when needed. The header shows the current folder, and the back button returns to the parent level.
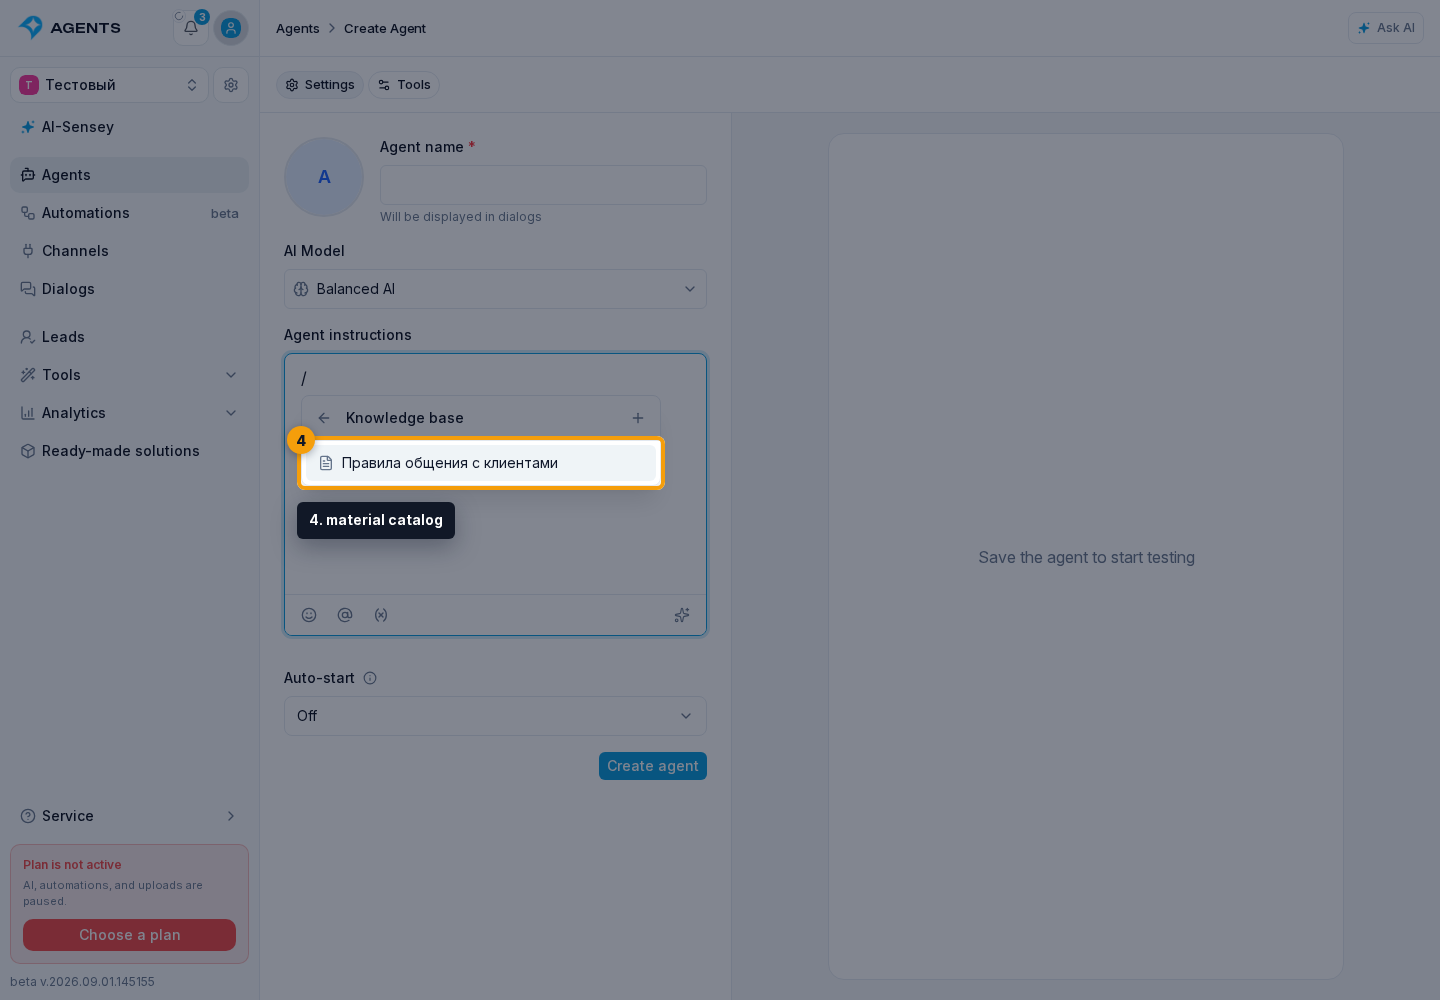
Choose the material you need. Text files, images, and tables can be selected; a folder opens its contents. If a suitable text file does not exist yet, create one from the Knowledge base section.
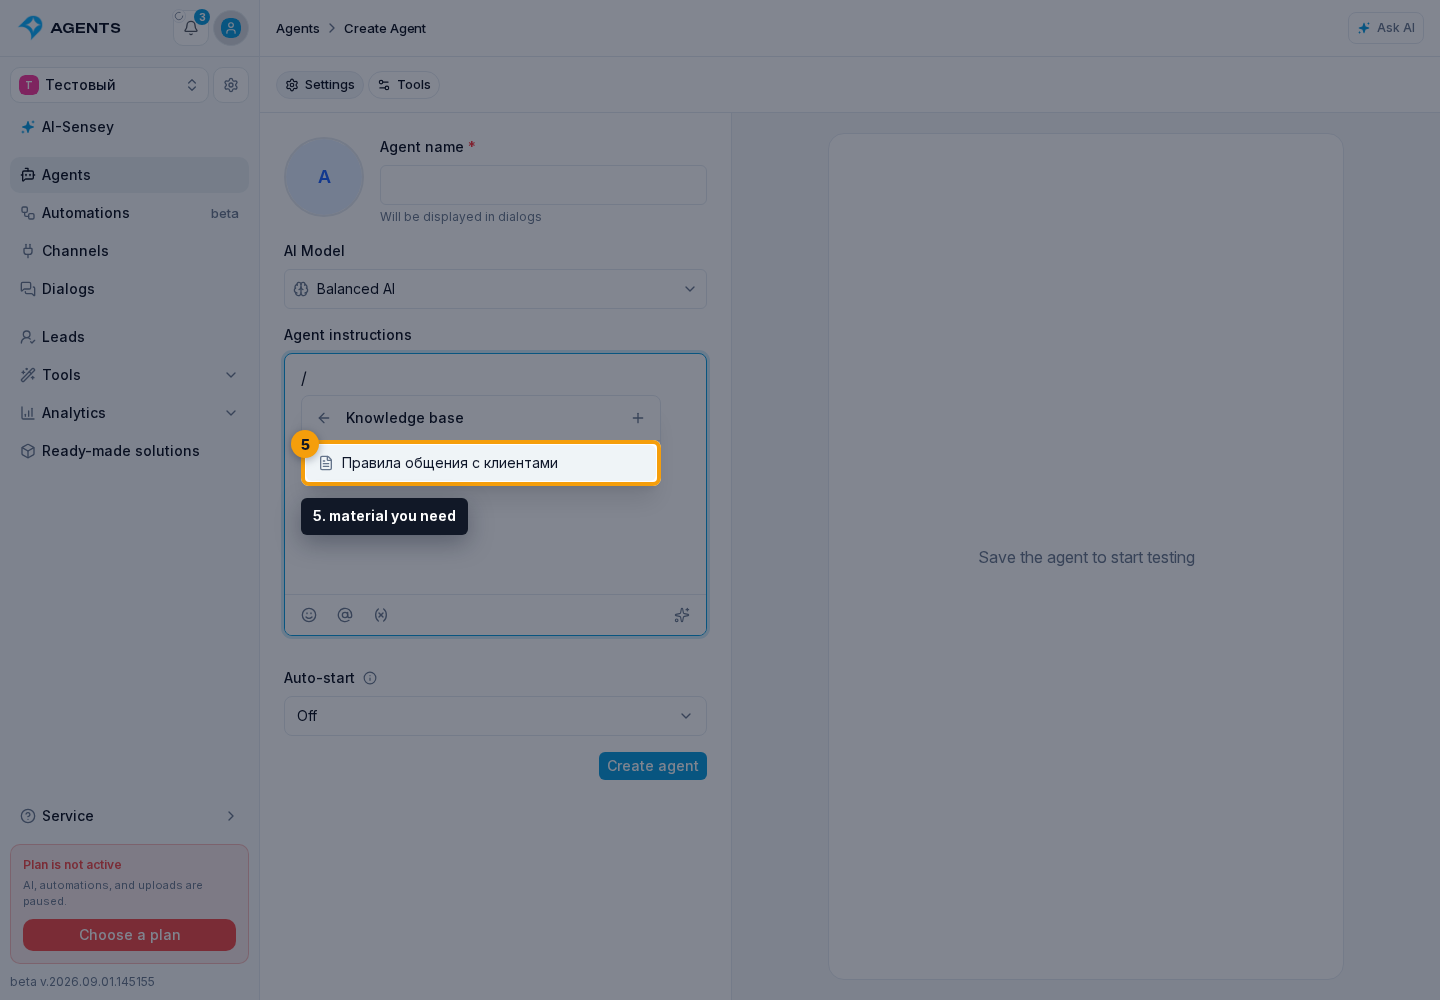
Check the reference in the instructions
A distinct link to the material appears in the instructions. The material is automatically added to the agent's knowledge base sources.
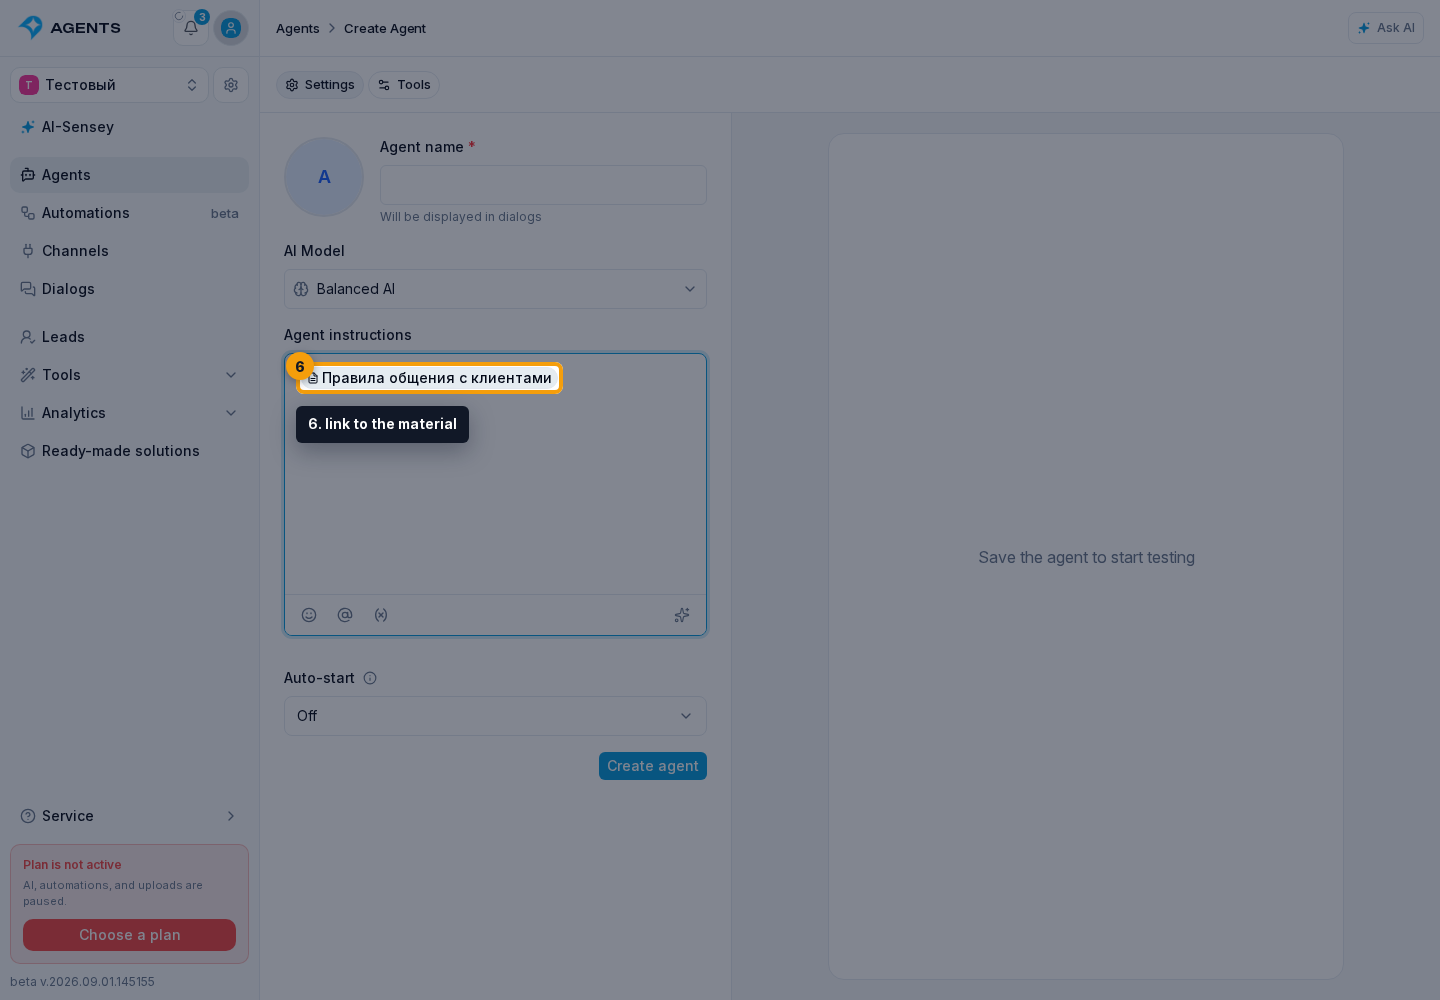
Edit the material and review access
Click the link in the instructions and wait for the material and its settings to open. For a text file, you can edit the title and text, then select Save.
At the bottom of the dialog, review the agent's permissions for this material.
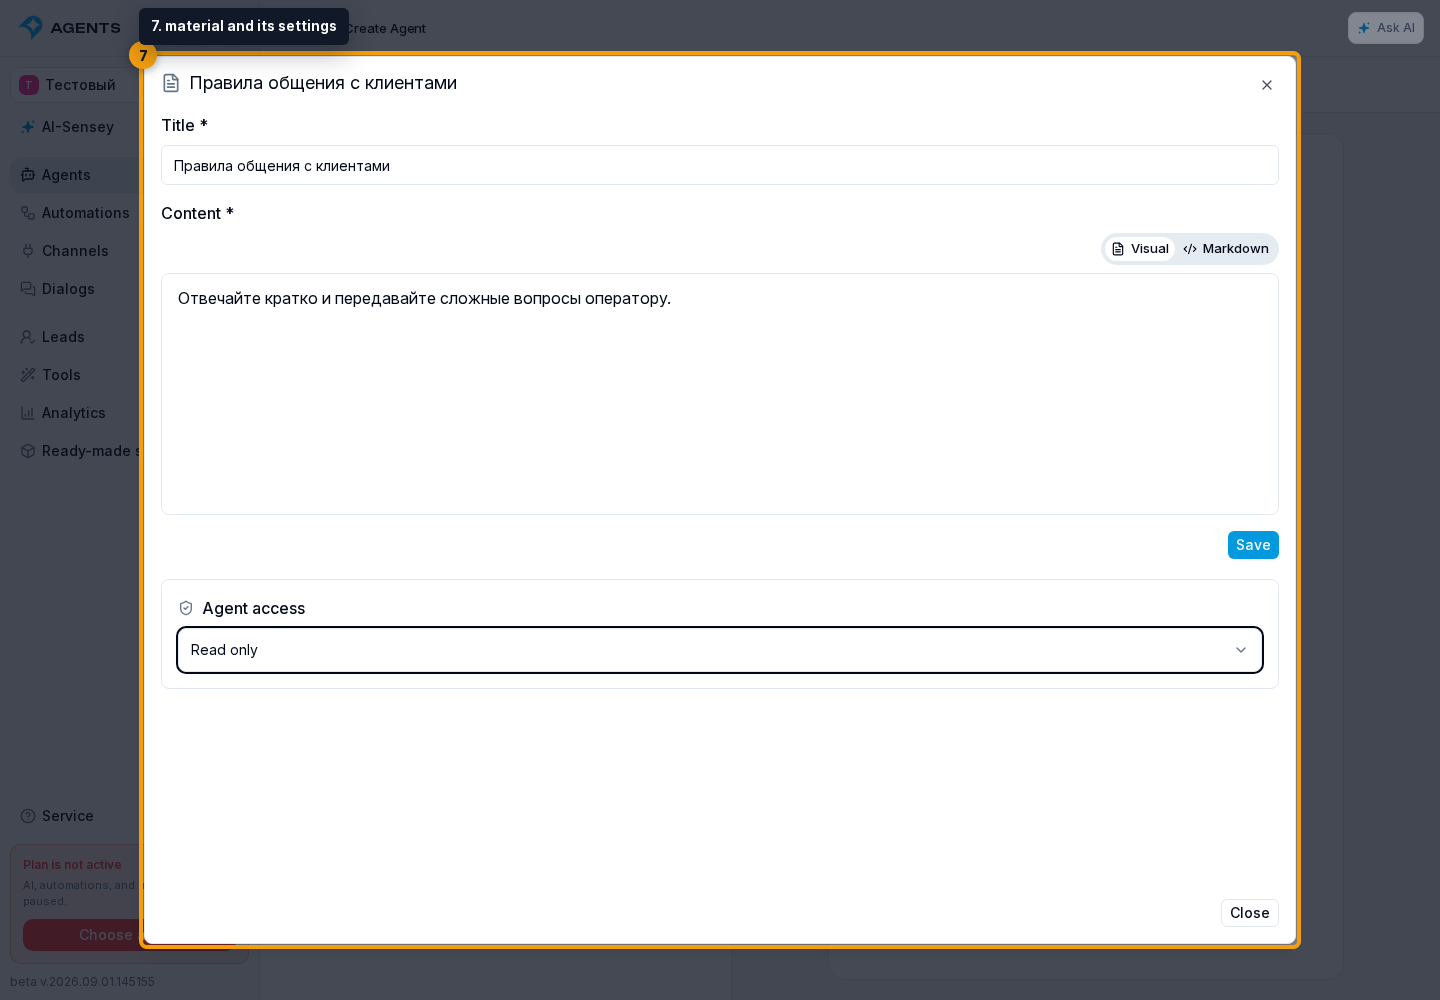
Save in this dialog changes the document in the project's shared knowledge base, not a copy for this agent. This is a separate save and does not wait for agent publication. Keep other agents using the document in mind when editing it. This agent's access permissions, on the other hand, belong to its draft and apply after publication.
When the linked material is a table, the embedded table opens instead of the text editor.
For a newly linked material, the cabinet immediately enables suitable read permissions. A table also gets row insertion and edit permissions. Review this set and remove edit access when the agent only needs to read the data.
On the Tools tab, this source is marked Used in the instruction. If you remove it from the source list, the cabinet warns that its instruction tag will also be removed. Confirm only after reviewing the instruction text. When the agent is copied or shared by link, related materials move with it and the instruction links are remapped to their new copies.
Autostart
Autostart determines when an agent is assigned to a dialog automatically. It is not the agent's activity switch: to pause the agent, use the status in the header.
In the Autostart mode field, choose one of these options:
- Off — the agent is assigned manually or by another rule;
- By Keywords and Link — the agent launches on configured phrases and can be subscribed to by link;
- On All Messages — the agent is assigned automatically to matching new messages.
When a mode is enabled, additional settings appear below it. In the channel list, keep all project channels or select only the ones you need. Then choose the dialog types — all, private, or group — and the agent role. The primary agent replies to the user; the background agent works in parallel, for example collecting data or metrics.
A background agent can identify the customer's interests, save useful information, and add the customer to suitable segments. Describe this task in its instructions and configure access to data and tools.
Assigning an agent to an existing dialog does not by itself start a review of earlier messages. When the customer next gets in touch, the agent can take the available history into account. To look into a past conversation now, turn to AI-Sensey.
A more specific rule, such as a keyword or segment, is applied before the general project rule.
When published rules overlap, the form shows auto-assignment conflicts. Publishing can require an overwrite confirmation: previous rules for the same area are disabled. Segment rules are changed separately on the segment page.
Keywords
If you chose By Keywords and Link, fill in the keyword field that appears and configure channels, dialog types, and the role as described above. Without keywords, this particular rule will not trigger on a message. That does not prevent an already assigned agent from replying or being assigned in another way. Changes to the rule take effect after publication.
Assignment for segment members is configured in the segment, and the agent's subscription link has its own page.
AI model
If the project uses own AI accounts, check the access indication when choosing a model: your account, a Senler account, or an unavailable model. Connecting one provider does not automatically make every model available. Senler fallback is enabled in billing settings and consumes project credits.
On a computer, click the current model in the AI model field to open the list. On a phone, model cards are already displayed in the form, so you can select the required option directly.
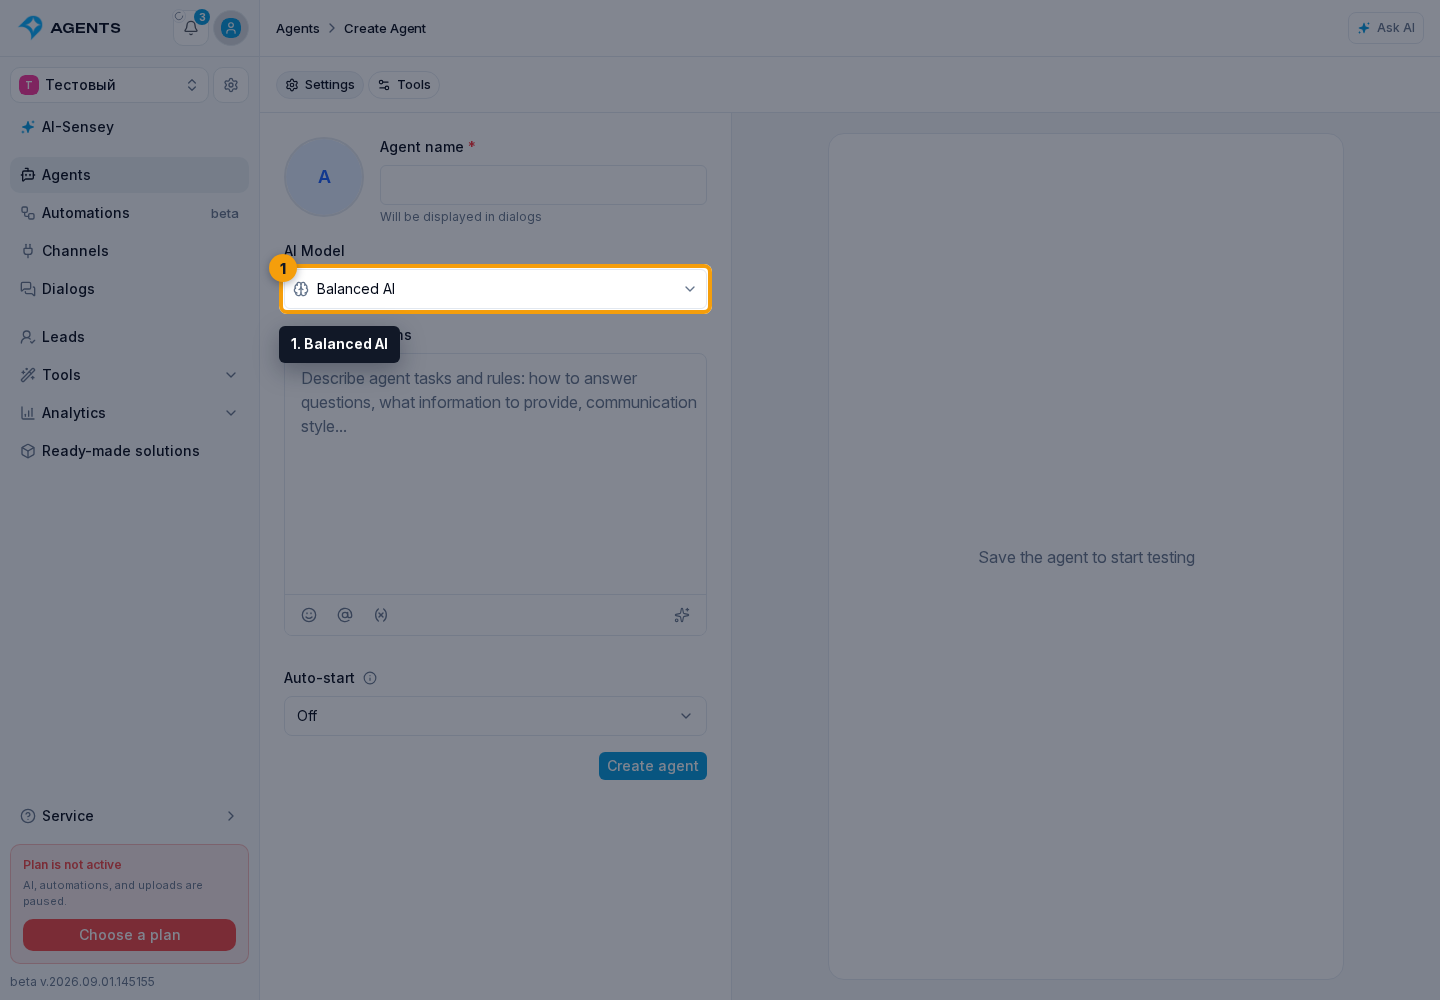
On a computer, use search by display name, technical name, or AI provider. There is no separate search field on a phone. Compare the cards and select the required option.
Every model has three comparative scales from one to five:
- Reasoning — how well the model handles complex reasoning; more means stronger;
- Speed — relative response speed; more means faster;
- Price — relative usage cost; more means more expensive.
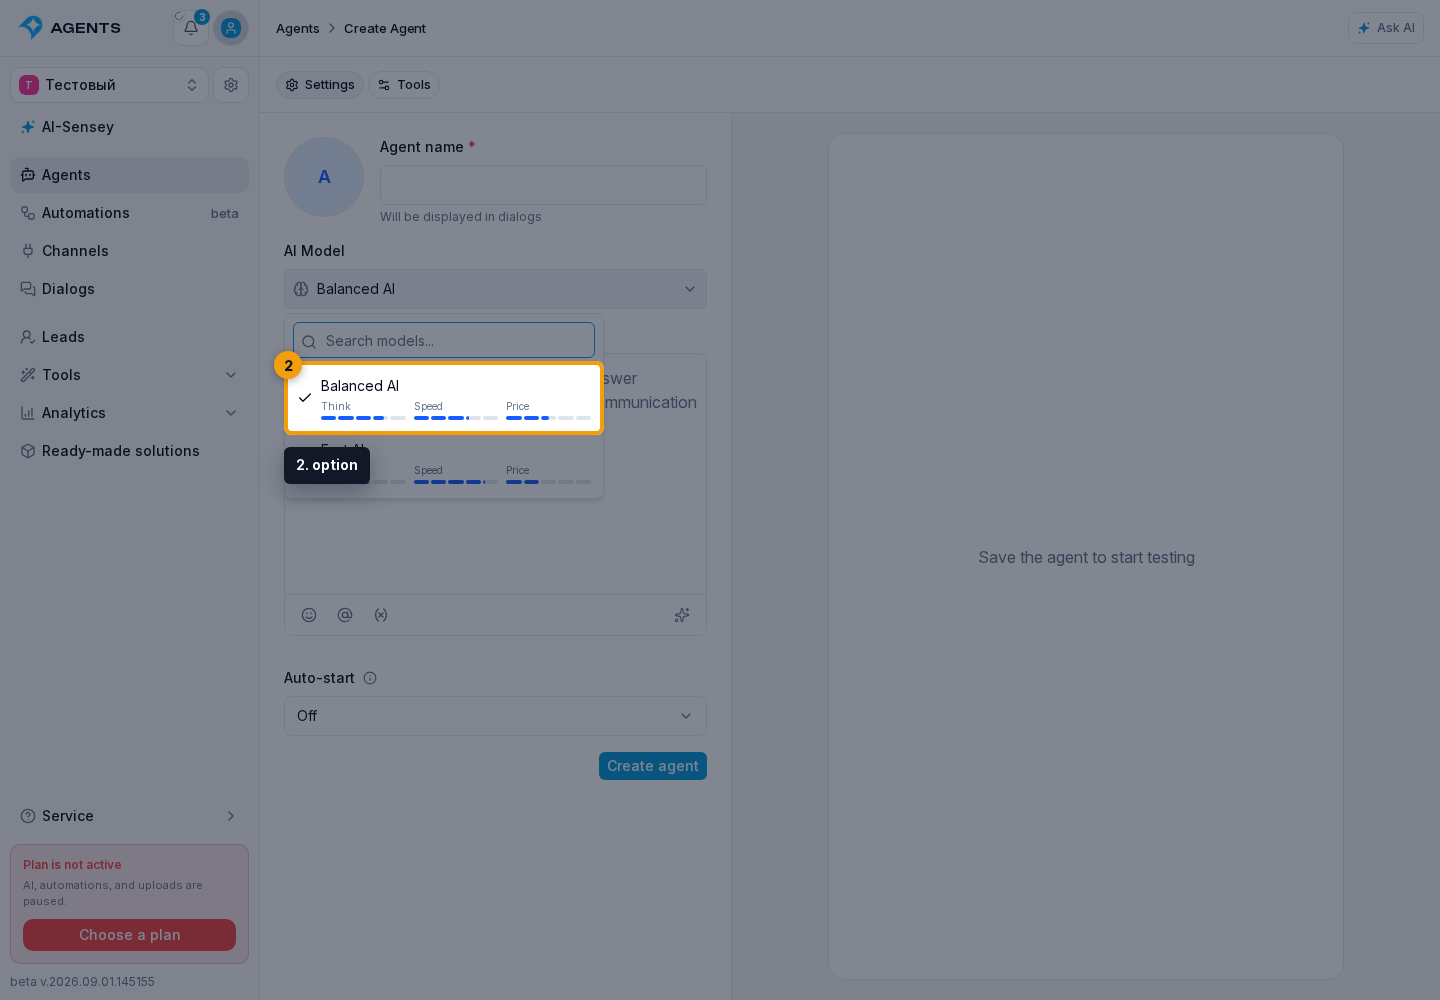
On a wide screen, hover over an option to open a card with its full description and actual credit rates. For a new agent, the cabinet selects the first available option, but it can be changed before saving.

The model must also support the selected MCP mode. If a new model cannot use the current mode, the cabinet shows a dialog with a replacement. Select Change model and mode to apply both changes, or Cancel model change to keep the previous settings. For an unsupported provider-direct mode, the cabinet first offers an option through Senler; if that is unavailable too, it offers No MCP servers.
A previously created agent may retain a model marked Outdated. It keeps working and is not replaced automatically, but it cannot be assigned to a new agent. To switch, explicitly select an available model, save the changes, and verify the result in a test dialog.
If the old model name cannot be retrieved, the card is called Previously selected model. This also does not indicate an automatic switch.
If form data does not load
The form separately loads the available MCP servers, server sets, and agent metrics. If one of these requests fails, a message with Retry appears above the form. This button requests only the data that failed to load.
Do not change settings that depend on the missing list until the error disappears. In the MCP dialog, Save is unavailable when the servers or sets required by the selected mode have not loaded.
After changing settings
Wait for confirmation that the draft has been saved. On a computer, open the test dialog on the right side of the page; on a phone, open Testing using the triangle button above the form. Try several typical questions by following the testing instructions.
If you are satisfied with the answers, publish the draft. To work with customers, the agent must also be active and assigned to the relevant dialogs — manually, through autostart, or by another rule. Saving a draft alone does not start the agent.
Copying and deleting an agent
For a saved agent, open the actions menu (⋯) in the upper-right corner. It offers copying, sharing by link together with related resources, and agent deletion.
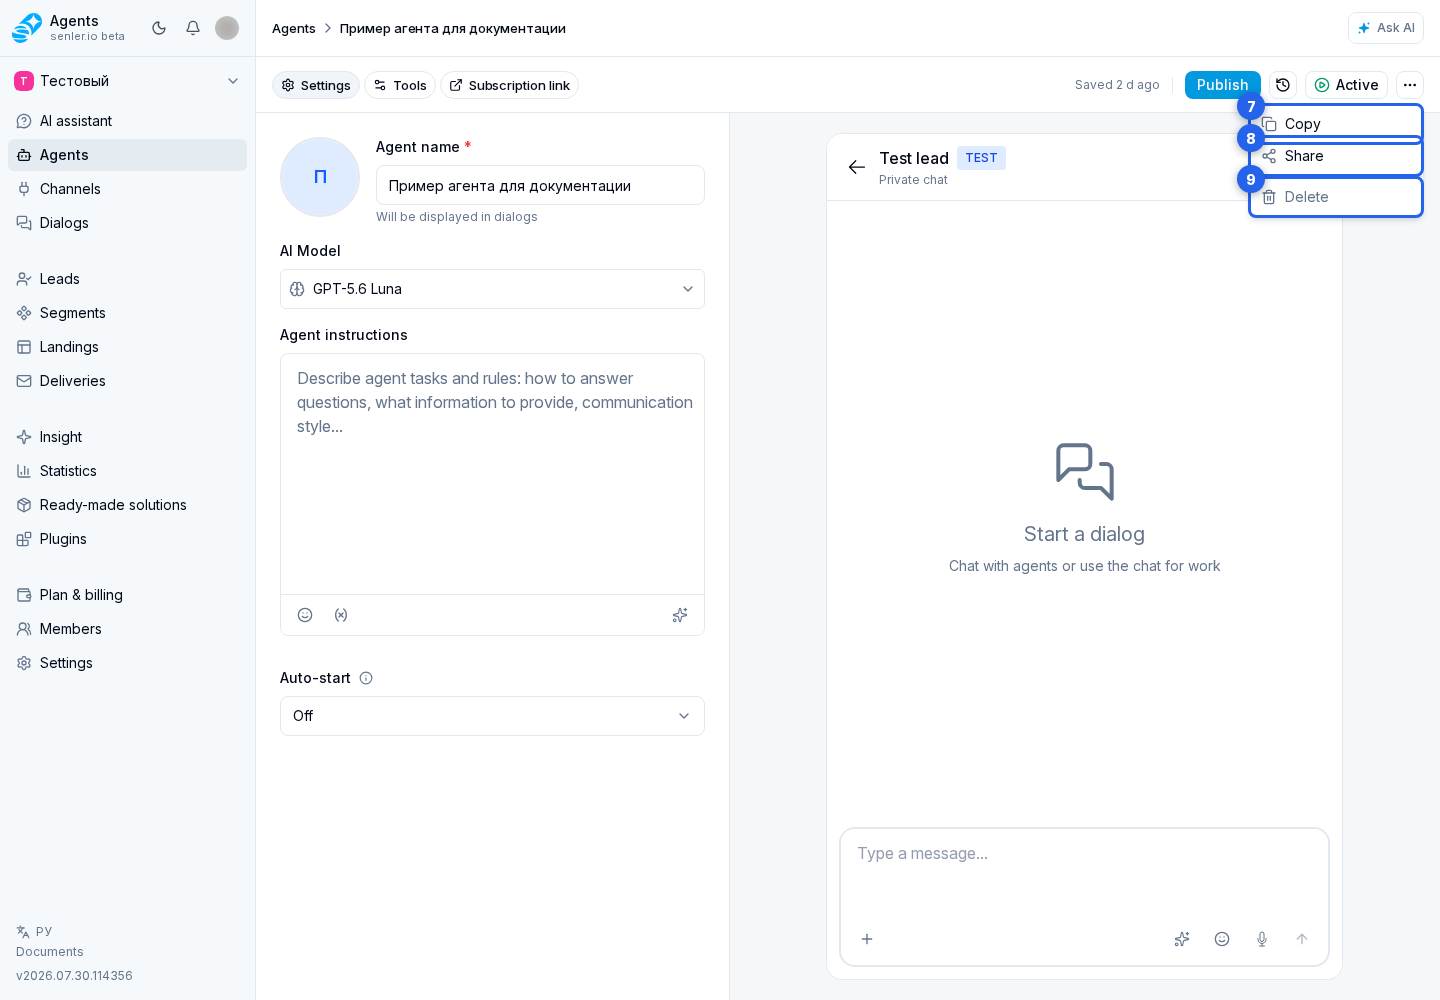
The cabinet asks for confirmation before deletion, and the agent cannot be restored through the form afterward. Deletion interrupts this agent's current replies and timers and detaches it from dialogs. Before confirming, make sure you are not deleting a live published agent.